Mockdoor Guides
Home of all your guides to using Mockdoor
Home - Mockdoor wiki
Welcome to the Mockdoor Wiki
This site is still under construction but you are welcome to browser the sites current content.
Mockdoor Guides
While you wait you can do one of the following
Or
Configuration Guide
Introduction
This page describes the available configuration options for Mockdoor. Configuration can be done via environment variables or updating the appsettings.json files in the source code.
Configuration Structure
"DeploymentConfiguration": {
   "PathBase": "/dev/mockdoor/",
   "SeedOnStartup": null,
   "ForceHttps": false,
   "Debug": false,
   "DebuggerUrl": "https://localhost:7275/dev/mockdoordebugger/debug/default/",
   "DatabaseConfig": {
     "Provider": 2,
     "ConnectionString": "Data Source=Data/mockdoor.debug.db;"
   }
}
Above shows the configuration options available. To set them in an environment varaible use the format "Parent__Child__Property=Value" for example to set the PathBase to "/test/path/" you would put the environment variable DeploymentConfiguration__PathBase=/test/path/".
Docker example
For docker you can set the environment variable using the -e argument when running the container. For example to run the container with the above configuration and also setting the "SeedOnStartup=Data/DemoSampleData.json" you would run the following command
docker run -d -p 44304:80 --name mockdoor -e DeploymentConfiguration__PathBase=/test/path/ -e DeploymentConfiguration__SeedOnStartup=Data/DemoSampleData.json" mockdoor/serverConfiguration Details
| Property | Environment Variable Path | Description | Example | Default |
|---|---|---|---|---|
| PathBase | DeploymentConfiguration__PathBase | Sets a custom base path, this changes the path used to access Mockdoor. For example if /test/path/ is used then instead of accessing Mockdoor homepage at https://localhost:44304 you access it from https://localhost:44304/test/path/. This is useful for when Mockdoor is behind a reverse proxy or in a K8 container and is not running on the base address. |
"/test/path/" |
/ |
| SeedOnStartup | DeploymentConfiguration__SeedOnStartup | Sets a json database import file to import during startup. This must be added to the Mockdoor Server project in order to be accessible. There is a sample file under the Data folder called DemoSampleData.json |
Data/DemoSampleData.json |
null |
| ForceHttps | DeploymentConfiguration__ForceHttps | If true, this forces all request to Mockdoor to redirect to the https standard | true |
false |
| Debug | DeploymentConfiguration__Debug | Sets if Mockdoor enables its additional debugging and diagnostics features. If true additional diagnostics page(s) will be enabled when errors occured. This can also affect the level of detail in some error messages in the UI | true |
true when running in debug mode and false if not |
| DebuggerUrl | DeploymentConfiguration__DebuggerUrl | This is currently a unsupported feature that allows Mockdoor to send the Live feed feature to an external debugger application. This application has not been released as it does not add to Mockdoor anymore (since the Livefeed is now embedded). This may be improved and updated in the future but for now that makes this setting not useful. | https://localhost:7275/debug/ |
null |
| Provider | DeploymentConfiguration__DatabaseConfig__Provider | Defines which database provider to use, 1 = Microsoft SQL Server, 2 = Sqlite | 1 |
null |
| ConnectionString | DeploymentConfiguration__DatabaseConfig__ConnectionString | The database connection string to use. Must be the correct format for the provider specified | Data Source=Data/mockdoor.debug.db; |
Data Source=Data/mockdoor.debug.db; |
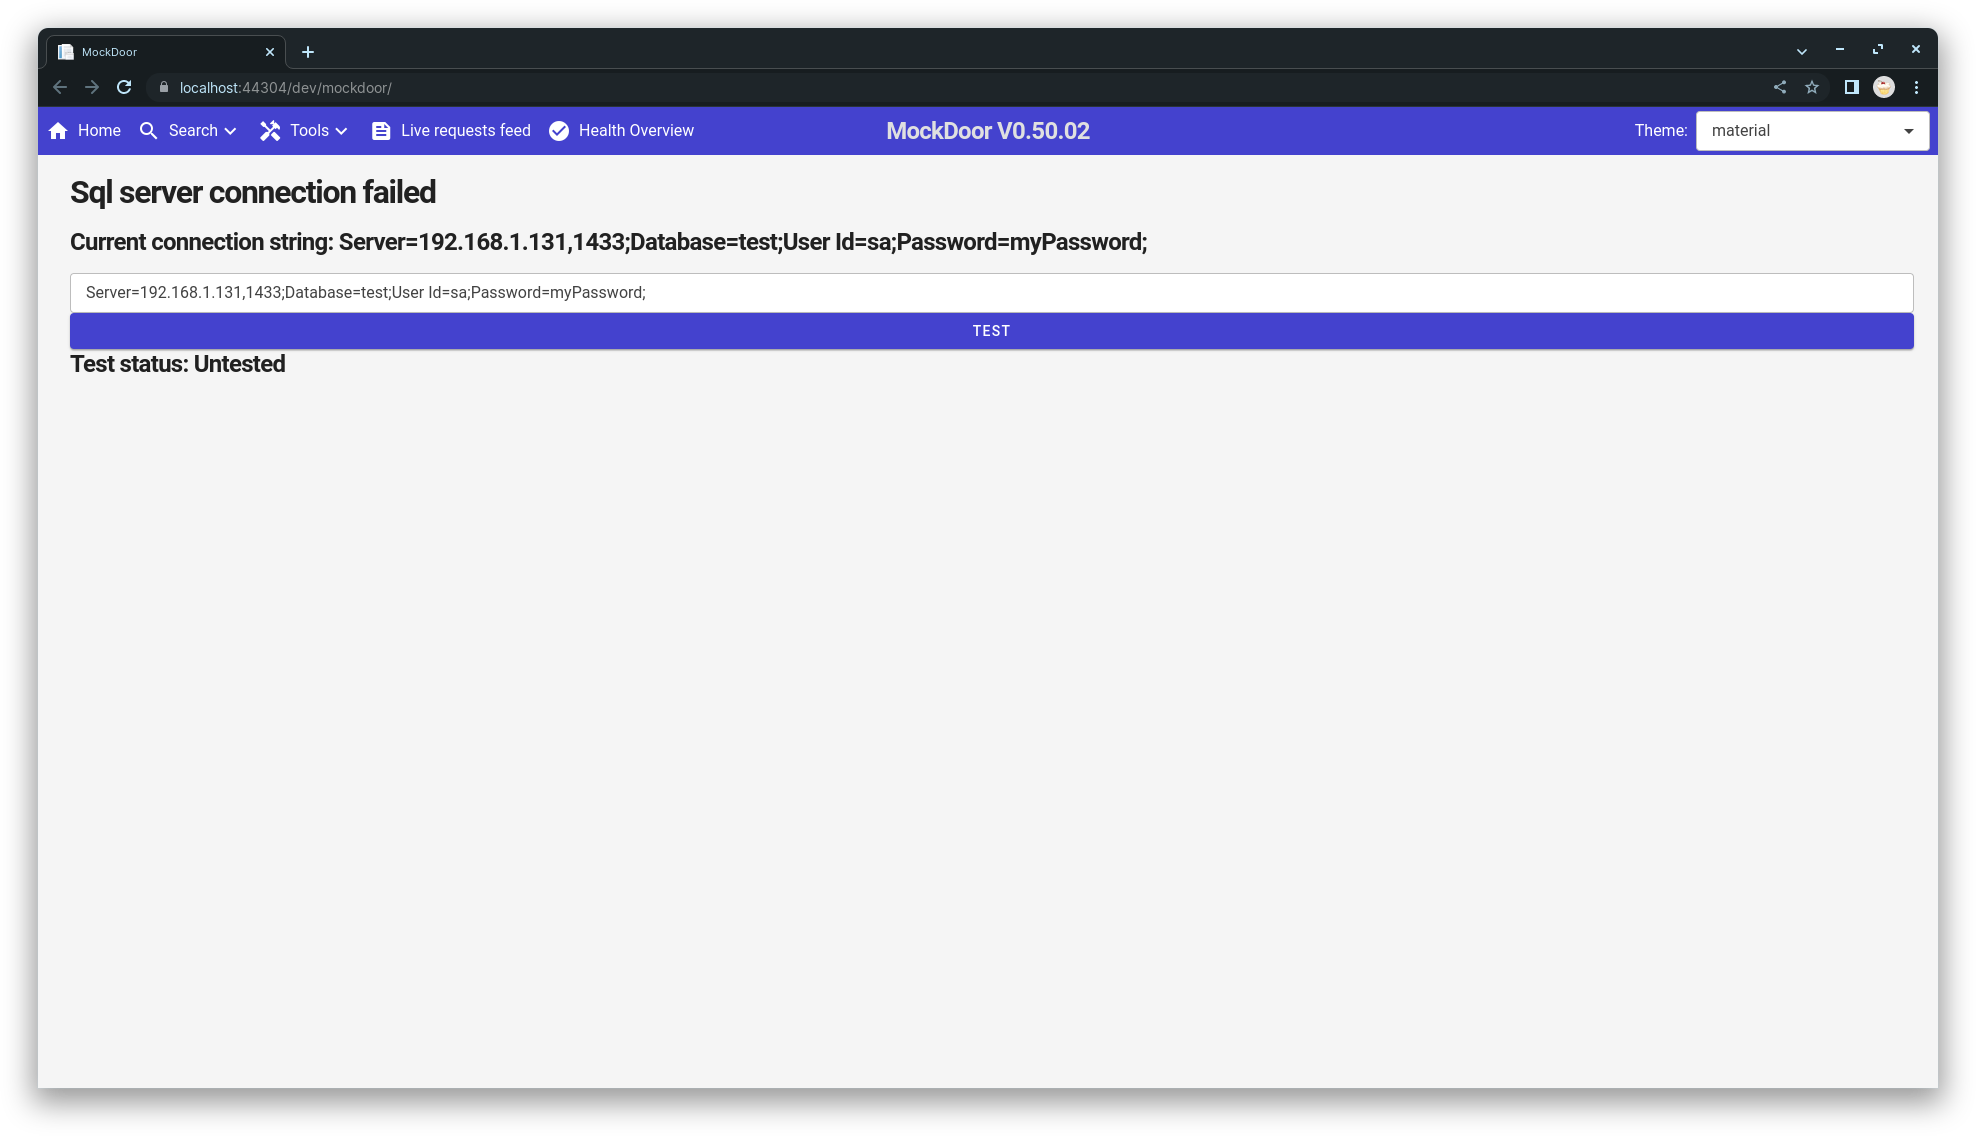
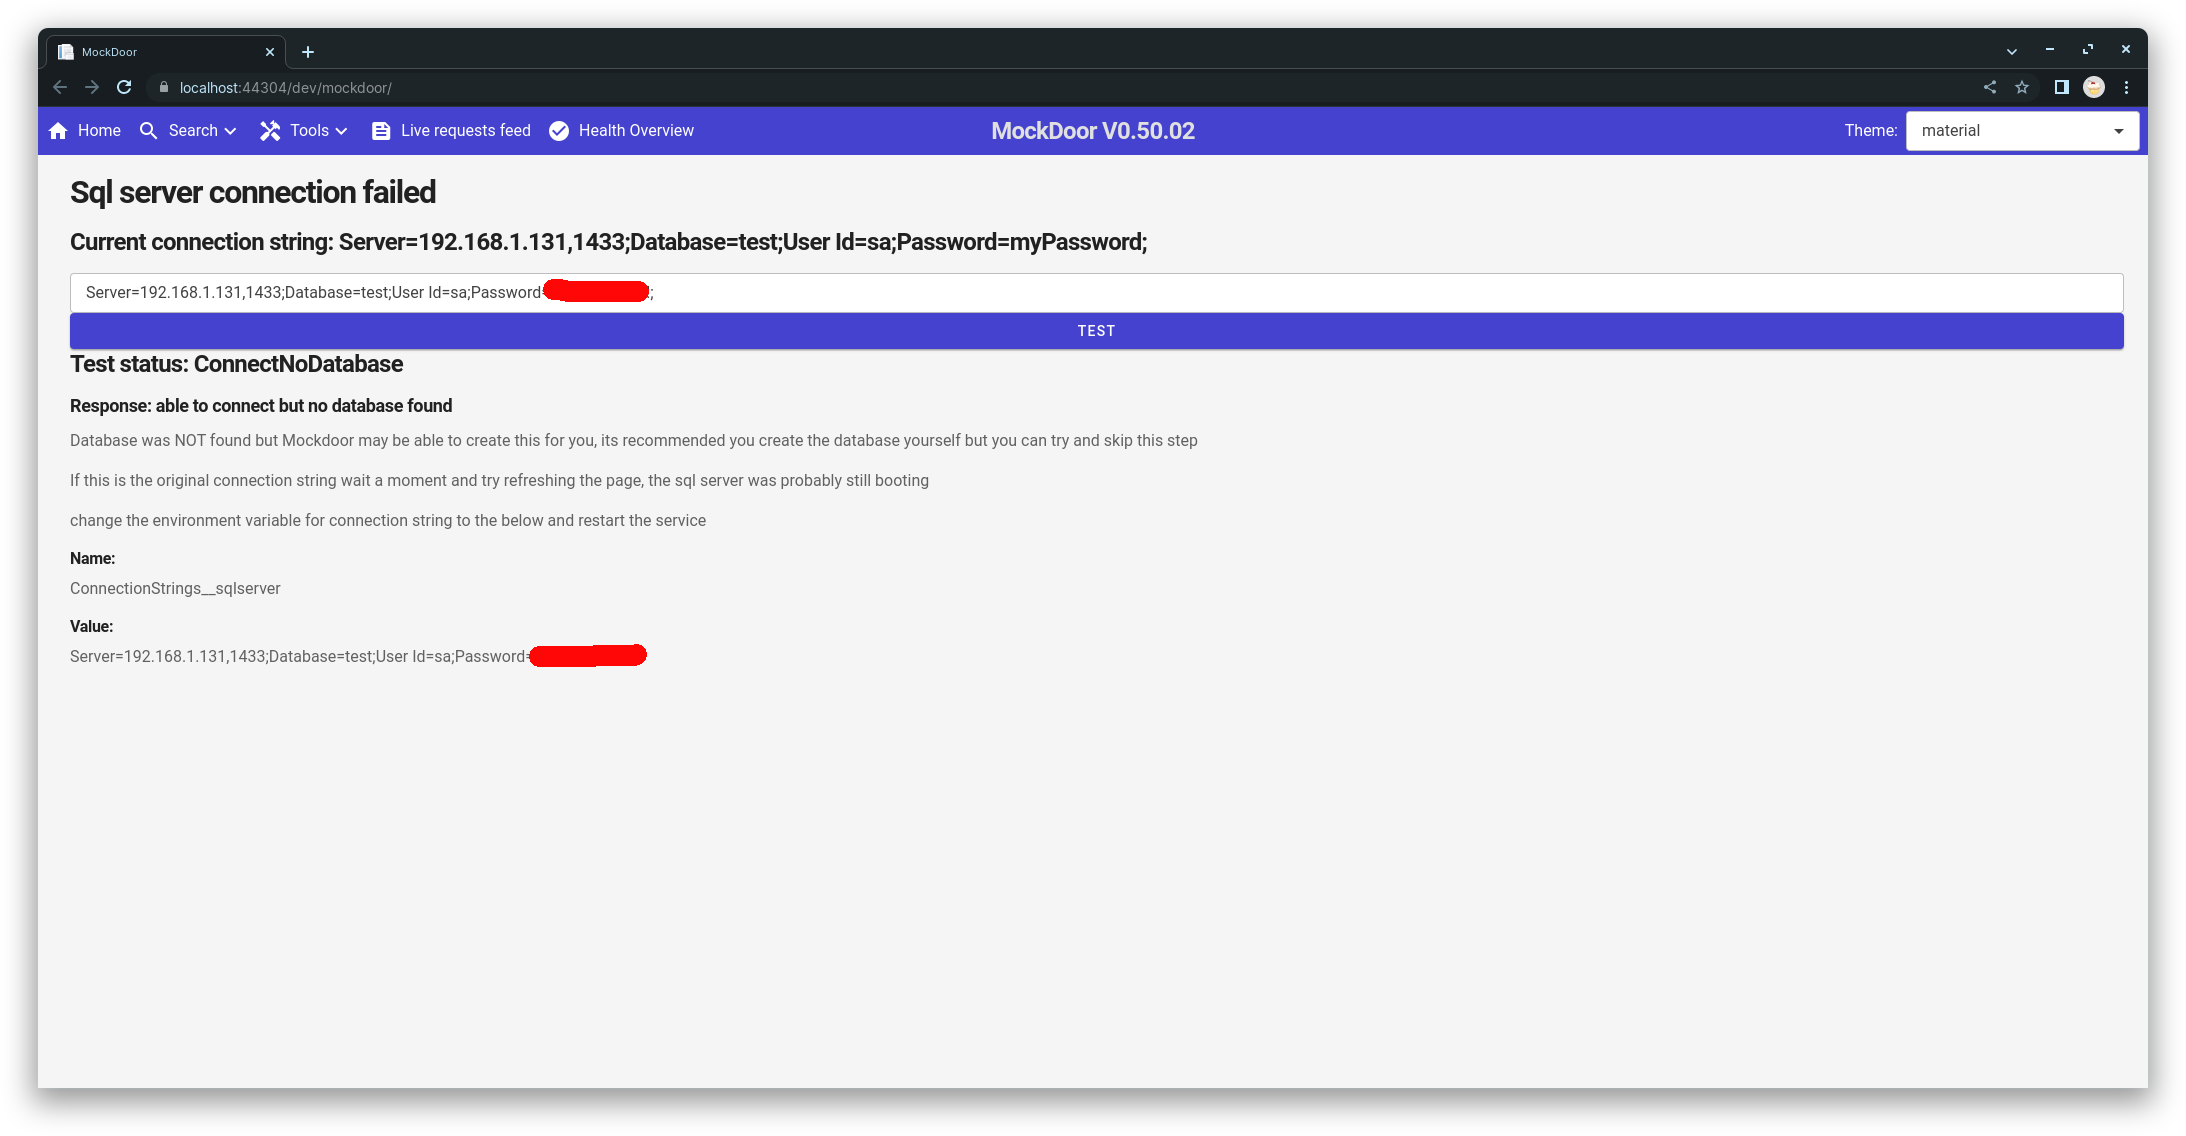
Startup Configuration Diagnostics
During startup the connection string will be tested. If it finds the database it not on the latest version if will list the pending changes (migrations) and ask you to apply them. For new installs or when pointing to a new databse this will always appear the first time you run Mockdoor.
Mockdoor will also Create the database if it does no exist so long as the connection string provided has sufficient permissions to do so. If the connection string fails for any reason and Debug mode is enabled a connection string debugging page appears. Here you can test the connection string in the UI by changing it directly to test the connection until it works. This does not support persisting the configuration so once a working connection string is found you could copy it into the environment variable or appsettings, replacing the bad connection string.
Getting Started
There are three quick ways to get started easily but as Mockdoor is available as a docker image and in source code the number of ways a development team could deploy and use it is practically endless. This guide will cover using a docker container and raw docker commands, using Microsoft Tye a tool created by Microsoft to simplify running and deploying multiple dotnet and/or docker containers (this guide will only cover running them) and finally running Mockdoor using the existing solutions and a suitable IDE such as Visual Studio or Jet brains Rider.
You can follow along with this guide on the "Mockdoor - Getting Started" playlist below. Apologies for the poor audio, this video will be updated with improved voice over in the near future.
Installation and Running Mockdoor
Prerequisites
If running via source code
If you are using the source code and solution file method or Microsoft Tyes source code options you will first need to download the Mockdoor project from https://github.com/mymockdoor/mockdoor (using git most likely), as well as downloading Mockdoor you need the following prerequisites
- git installed (see https://git-scm.com/)
- dotnet 6.0 SDK
- A dotnet IDE/Editor such as Visual Studio, VS Code or Jet brains Rider
- If using Tye you need to install it:
- to install run this command (for full instructions see https://github.com/dotnet/tye)
dotnet tool install -g Microsoft.Tye --version "0.11.0-alpha.22111.1"- you may also need to install Docker depending on setup (see https://www.docker.com/)
For anything other than testing Mockdoor it is recommended you use a SQL database as well which means having access to a MS SQL database with a valid connection string ready
If running via Docker
- Docker installed locally (see https://www.docker.com/ for more details)
- If using Tye you need to install it:
- Any dotnet core (recommended 6.0)
- to install run this command (for full instructions see https://github.com/dotnet/tye)
dotnet tool install -g Microsoft.Tye --version "0.11.0-alpha.22111.1"
For anything other than testing Mockdoor it is recommended you use a SQL database as well which means having access to a MS SQL database with a valid connection string ready
Downloading the source code
If you are going to download the source code it is recommended to use git so be sure its installed. You can download mockdoor by opening a command/terminal in the folder you wish to download Mockdoor and running the following command. You can view the source code here.
If you are in the root folder you want Mockdoor
git clone https://github.com/mymockdoor/mockdoor.git .or to download to a folder inside your current location and move in to it
git clone https://github.com/mymockdoor/mockdoor.git
cd mockdoor
Note the "." in the first option at the end. this is important and denotes to download to the folder you are in.
You should now have the source code downloaded. If you chose the second option you should see Mockdoor in a folder called "mockdoor" in your file browser.
Getting started with Docker
The official Mockdoor docker hub page can be accessed at https://hub.docker.com/r/mockdoor/server, at time of writing the current latest version of Mockdoor is “0-50-04”, this can be downloaded from docker using the tag “0-50-04” or the default “latest” which will always be the latest version.
To run Mockdoor you can run the following command
docker run -d -p 44304:80 --name mockdoor mockdoor/server
To run Mockdoor against a Microsoft SQL Server (replacing <> with your connection string)
docker run -d -p 44304:80 --name mockdoor -e DeploymentConfiguration__DatabaseConfig__Provider=1 -e DeploymentConfiguration__DatabaseConfig__ConnectionString="<<connection string>>" mockdoor/server
If you wish to play with the configuration you can reference the configuration guide for more details
Getting started with Microsoft Tye
Ensure you have Microsoft Tye installed.
To install run this command (for full instructions see https://github.com/dotnet/tye)
dotnet tool install -g Microsoft.Tye --version "0.11.0-alpha.22111.1"
Avast and possibly other Anti virus software,have been known to block the install of Microsoft Tye. It is an official microsoft project and you can verify it for yourself if desired in the above link on github. If this happens and assuming you are comfortable doing so just set an exclusion for Tye and retry the install.
If you downloaded the source
To start Mockdoor using tye
- Open a command/terminal window
- Navigate to “
[your repo]/Mockdoor/Server” - If you wish to run using the source files
- Use the command “
tye run tye.yaml"
- Use the command “
- If you wish to run using the public docker image
- Use the command “
tye run tye-image.yaml"
- Use the command “
You can open Mockdoor at http://localhost:44304/ to directly view Mockdoor
Tye also has a dashboard that enables viewing logs and debugging issues. You can access this by default from http://localhost:8000
If you wish to play with the configuration you can reference the configuration guide for more details
Without downloading the source
If you do not wish to download the source you will need to create a "tye.yaml" file describing how you wish to run Mockdoor. As you do not have the source you will need to use the public Docker image approach.
Below is a sample "tye.yaml" to get you started, you can modify this to customise Mockdoor if you wish.
This guide will not cover how to write and customise Tye Yaml files. See the Tye documentation for more details
For Mockdoor configuration details see the configuration guide for more details
services:
- name: mockdoor-server
  image:  mockdoor/server:latest
  env:
    - name: DeploymentConfiguration__PathBase
      value: /
  bindings:
    - port: 44304
      protocol: http
Now run the following steps:
- Save the above code (or your own version) in a file called "
tye.yaml" - Now open a command window in the "
tye.yaml" files location - Use the command “
tye run tye.yaml"
You can open Mockdoor at http://localhost:44304/ to directly view Mockdoor
Tye also has a dashboard that enables viewing logs and debugging issues. You can access this by default from http://localhost:8000
Getting started with source code and solution file
When running from source it is recommended you use the “Mockdoor.Server” launch configuration from the “launchSettings.json” (located at “[your repo]/Mockdoor/Server/Properties/launchSettings.json”), this profile defaults to running Mockdoor on a custom base path. This is because Mockdoor is developed by default on custom paths to avoid introducing bugs in this setup (as its easy to introduce a bug on this setup that would not appear during testing on the default root path).
Note: If you wish to change the path base you must change it in the “launchSettings.json” and in the “appsettings.development.json” file as well under the setting “DeploymentConfiguration__PathBase”, changing it to the value “/” or null will restore Mockdoor to the default hosting path.
- Open the Mockdoor.sln file in your IDE of choice
- Set Mockdoor.Server as your start up project
- Start Mockdoor
Mockdoor should by launched by your IDE, if it is not you can open Mockdoor at https://localhost:44304/dev/mockdoor/ or if you opted to run from root using the above guide https://localhost:44304/
If you wish to play with the configuration you can reference the configuration guide for more details
First Steps
Launching Mockdoor for the first time
The first time you run Mockdoor you will be greeted with a update screen that shows pending updates to run on the database. If you specified a custom connection string and there is an issue a diagnostics screen may appear, be sure to enabled “Debug” mode (see configuration guide ) if you do not see this diagnostics screen.
Once you get the valid update screen (shown above) simply click apply migrations and you are done.
Your First Mocks
Now you are running you can create your first Mock. There are two ways mocks are created in Mockdoor, Automatic (Training mode) mocks and Manual mocking. Below shows a guide to setting up a mock using both methods.
Regardless which mocking method you use, you first need to take a few basic steps, this is because all mocks in Mockdoor are grouped under a tenant, a group and a Microservice. Below shows the basic way for creating these but when working on multiple Tenants and Microservices, a Setup Wizard is available to speed up the setup process. These will be covered in more detail in another guide.
For now, below goes over setting up a basic Tenant, Group and Microservice to get you started.
Initial configuration
Tenant
Tenants are a way to handle multiple Tenants (customers) on a single instance of Mockdoor, for those not using multi tenancy it is perfectly fine to setup a "Developer" or other default tenant and use just that.
Tenant setup
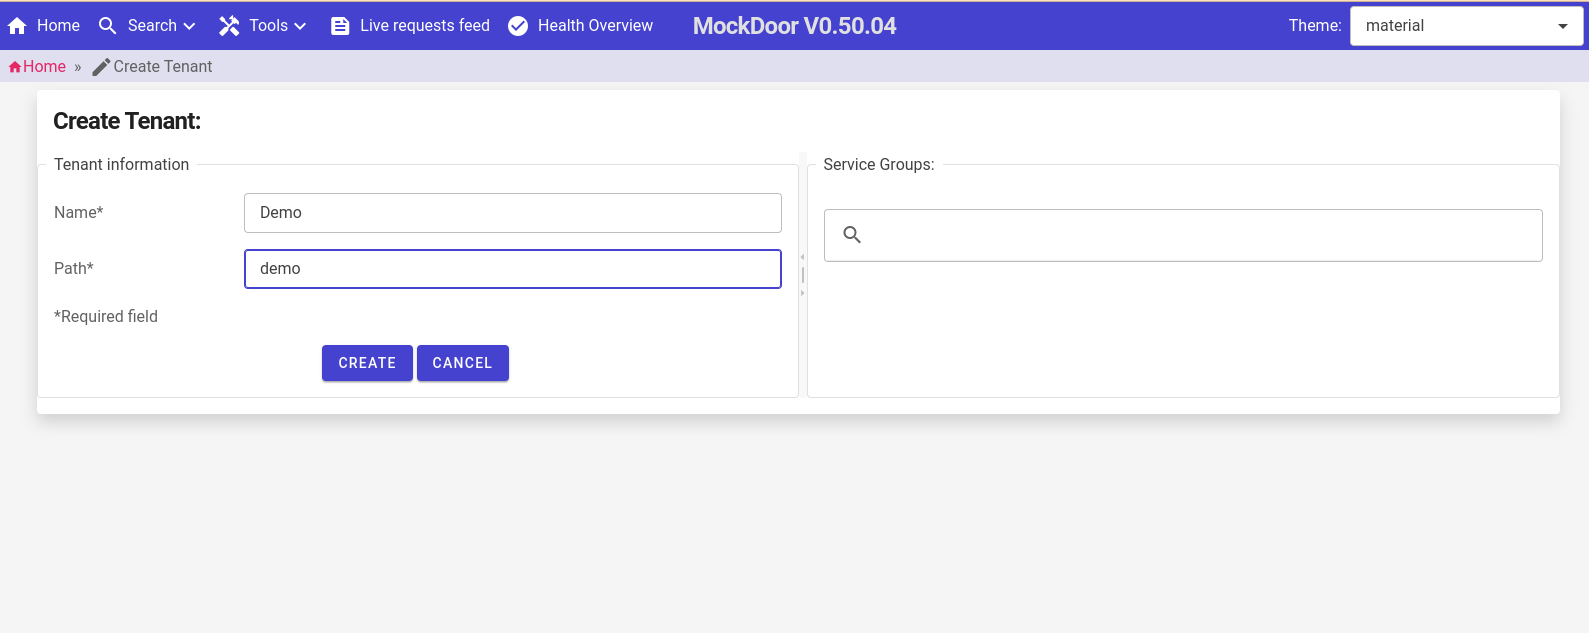
- In the top right click "Add Tenant". See Figure 1
- Tenants require two Properties:
- Name: a user friendly name to identify the Tenant
- Path: A unique url path segment for this Tenant (usually a short string with no special symbols such as "customer1")
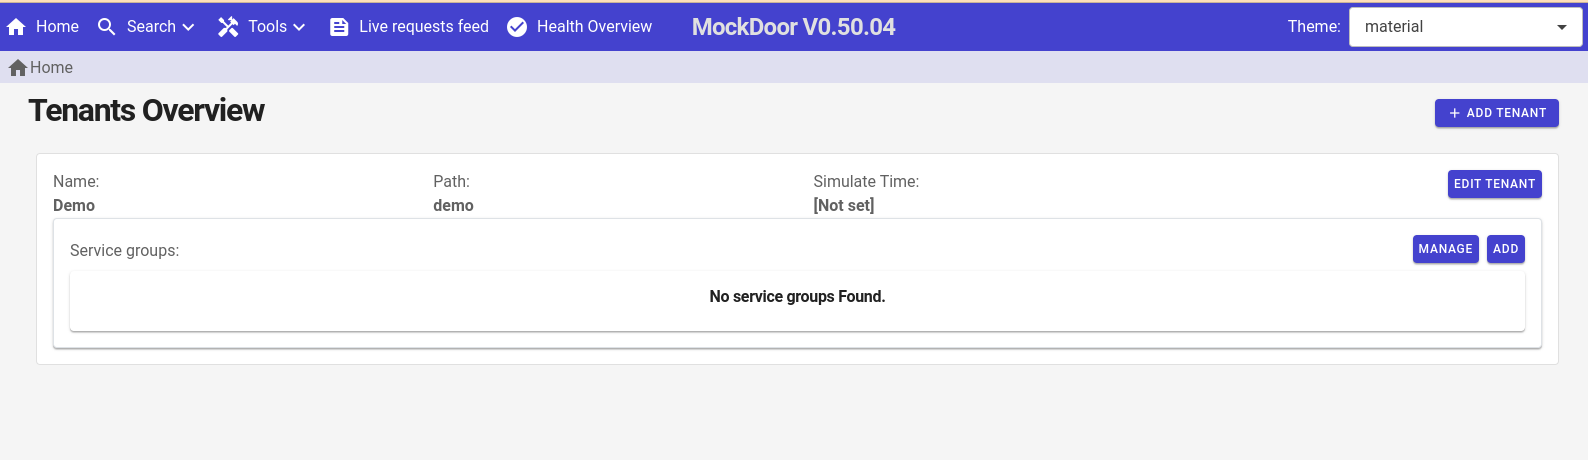
- Click "Create". See Figure 2
You should be returned to the Tenants page.
Service Group
Service groups are simply a way to group multiple Microservices and their respective mocks into a group (similar in concept to a folder). The main purpose of this is to enable multiple test environments in any way that suits your needs, allowing you to creating multiple independent mocking setups for each Microservice. For this simple guide we can create a "Demo" group.
Group setup
- From here you can click "Add" in the Tenant details panel see Figure 3
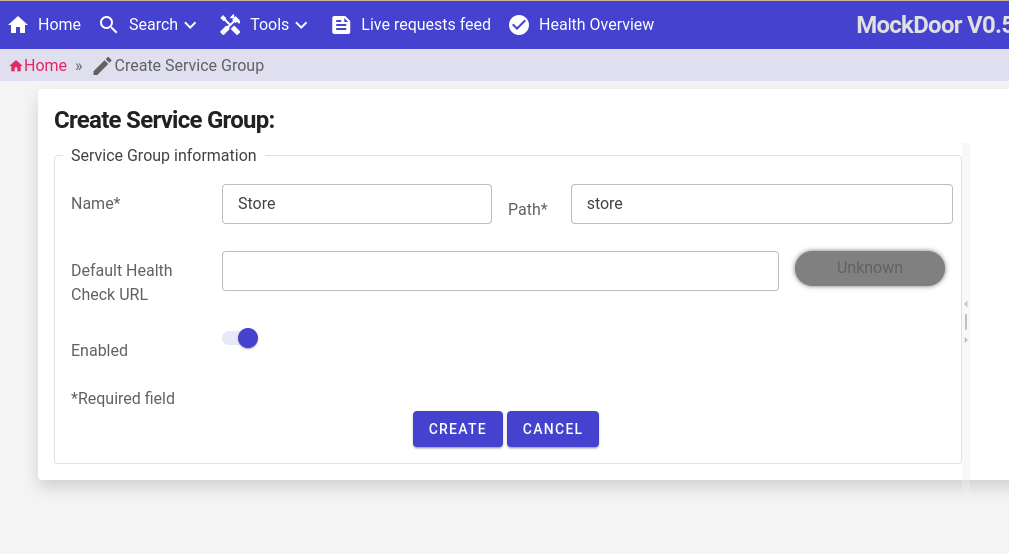
- Groups require two mandatory properties and offer a third optional property:
- Name (Mandatory): a user friendly name to identify the Group
- Path (Mandatory): A unique url path segment for this Group (usually a short string with no special symbols such as "default")
- Default Health Check URL (optional): A url to run health checks on for this group, for now we can leave this empty
- Click "Create". See Figure 4
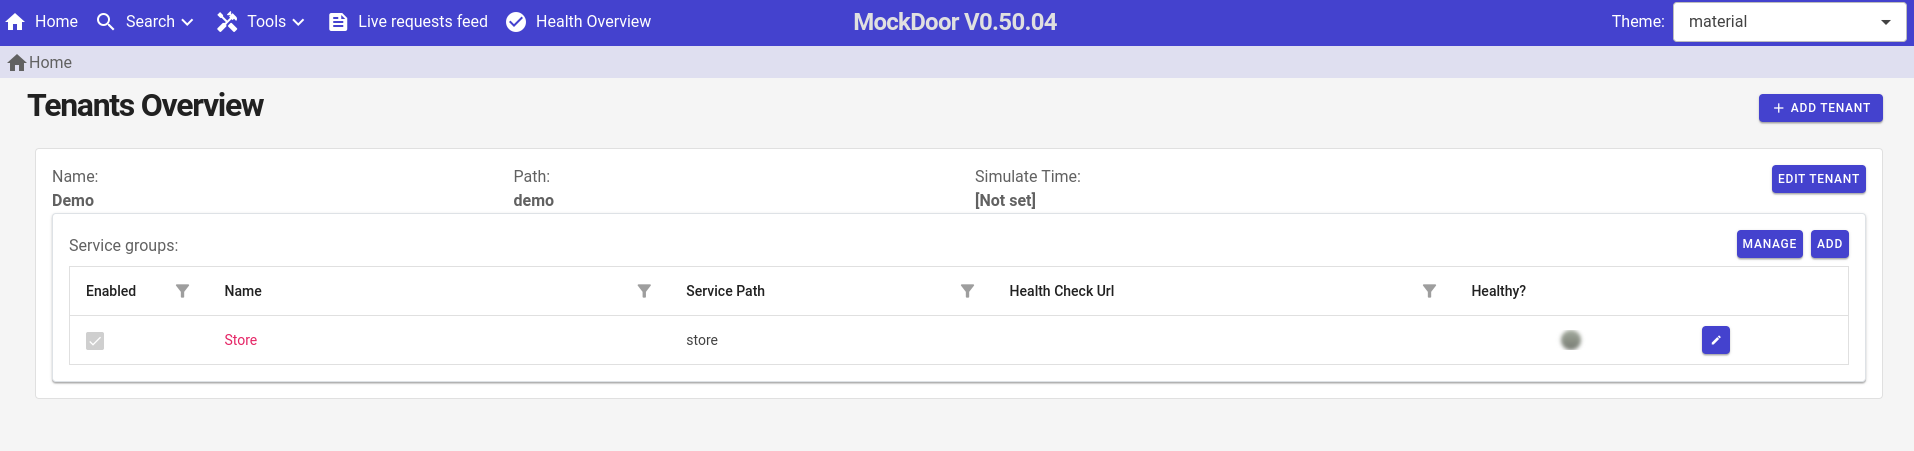
You should be returned to the Tenants page again but now with the group visible. see Figure 5
Microservice
The final level you need to create is a Microservice, this represents the Microservice you will be mocking and has many more details. It is the core of your setup and handles many details which will be covered in another guide in more detail.
For now we need to set up a Microservice which can support mocking for Automatic Mocking so we can complete the Automatic Mocking step below. If you do not intend to use the automatic Mocking feature you can skip setting the "Target Url/Domain", will need to set "Proxy mode" to false/off and can skip setting any Header details.
Microservice setup
- Click on Manage in the Tenants panel
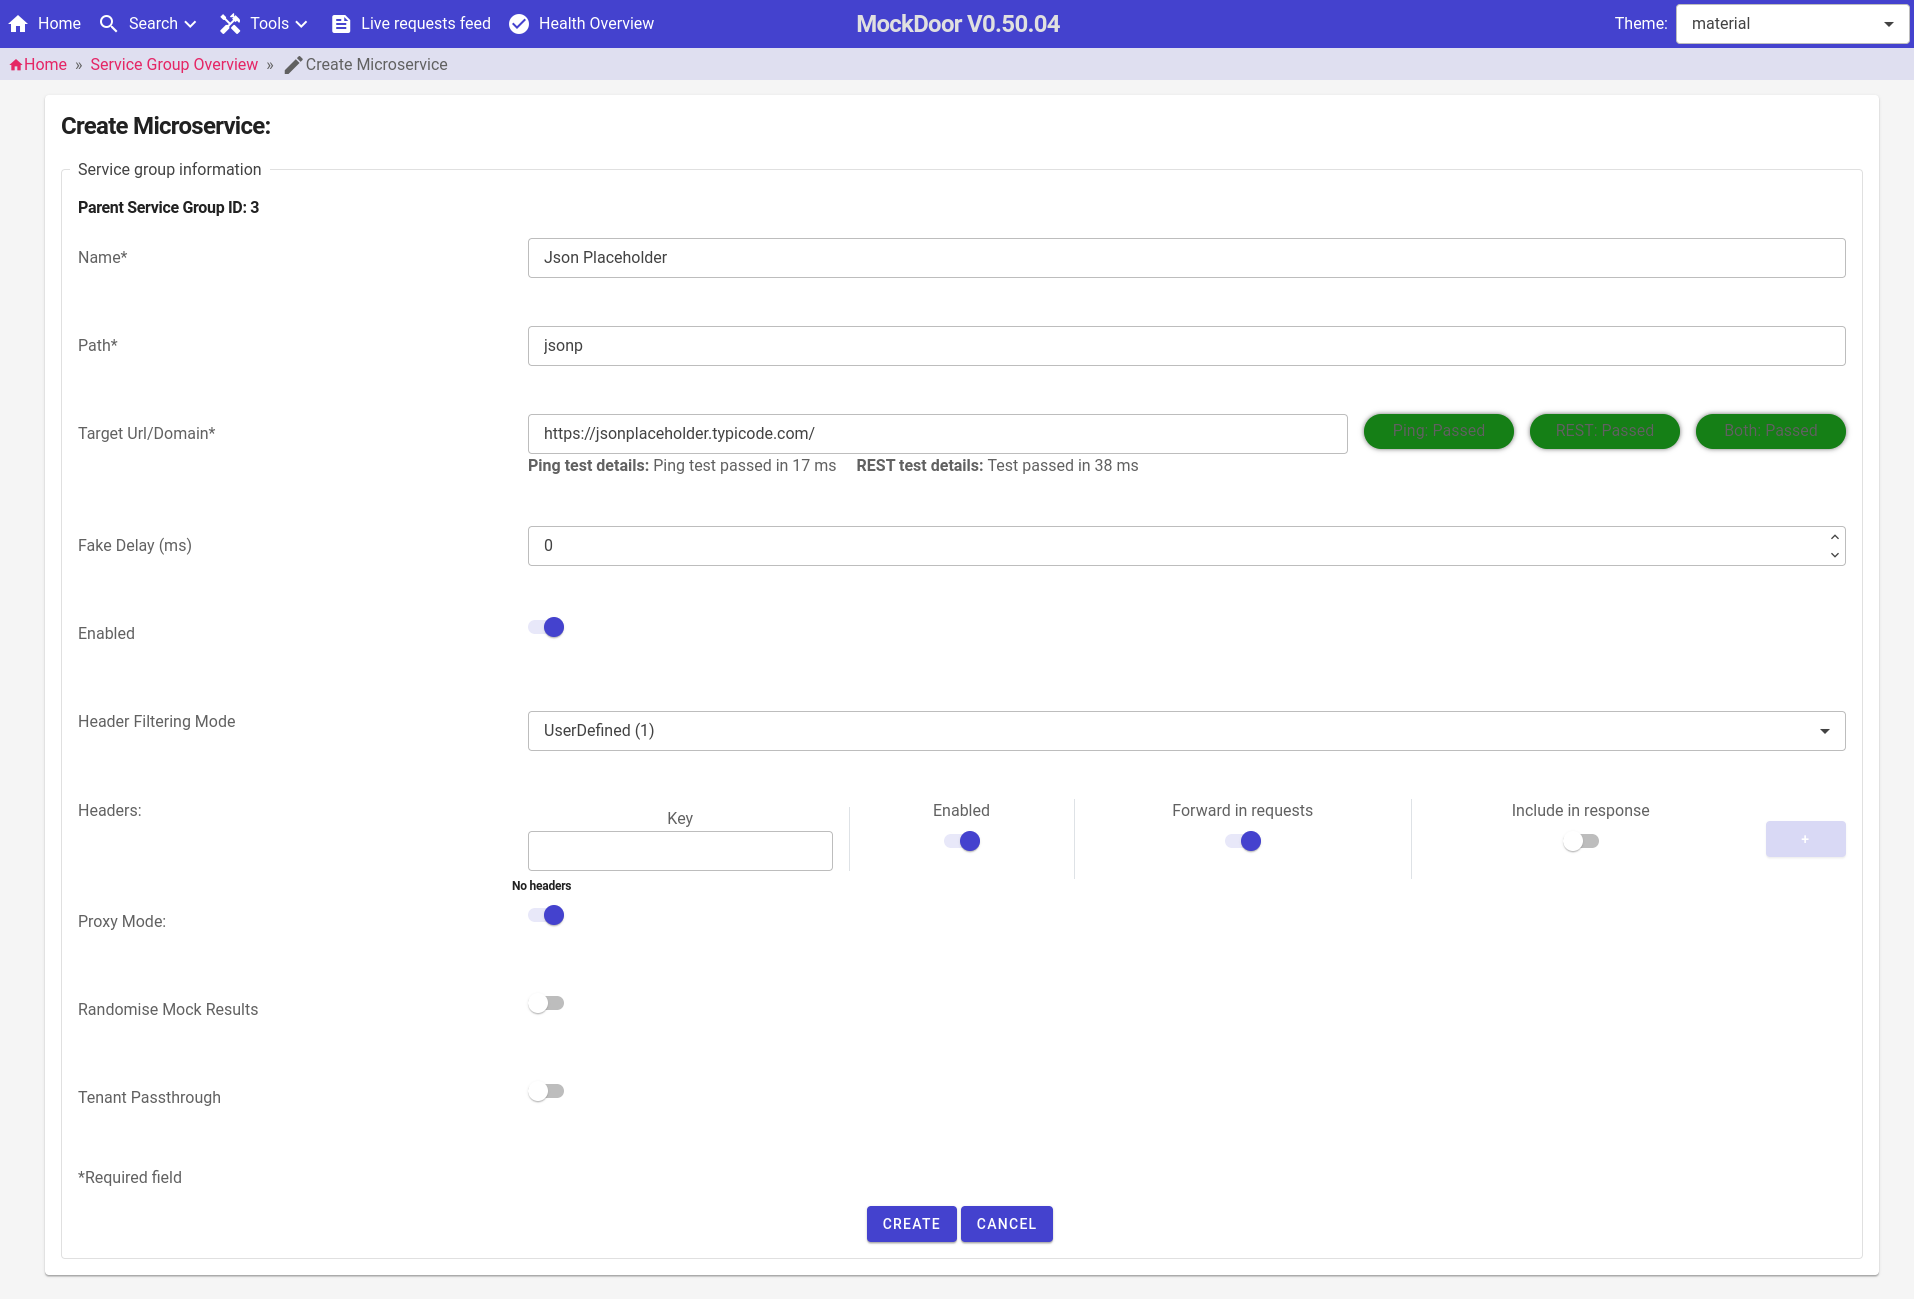
- Click "New Microservice" in the top right of the group details panel. see Figure 6
- Microservices have allot of fields but the key ones we need to fill out are:
- Name: a user friendly name to identify the Microservice
- Path: A unique url path segment for this Microservice (usually a short string with no special symbols such as "orderapi")
- Target Url/Domain: This is the for URL to the Microservice you intend to add mocking too. This could also be the domain for a public API you wish to mock as well. For this demo, to avoid additional dependencies we will use a public API "http://jsonplaceholder.typicode/" as it supports simple API endpoints with anonymous access and is easy to use/test.
- Proxy Mode: This defines the behaviour of Mockdoor when a request is made to any endpoint for this Microservice. When enabled, any request will be proxied to the provided target url and a mock automatically created. We will leave the "Proxy Mode" on the default to prepare for the Automatic Mocking section
- You can click the test buttons to the right of the Target url to confirm the domain. See note 2
- Click "Create" when ready. See Figure 7
Note 1: This demo will not setup any headers for the Microservice as they are not required but its important to know any API that requires access tokens or other authorization headers will need you to add a "Authorization" header or they will fail as the Authorization headers will not be passed forward by default.
Note 2: This test button confirms both "Ping" which typically should always pass, and "Rest" which attempts a REST request, this may fail if the url has no API at its root, this has no affect on if the URL is valid or works and can be ignored.
You should land on the service group overview and see your new microservice listed under your group. See Figure 8
Congratulations on getting this far, the initial setup is done, we are now ready to start creating Mocks!
Creating an Automatic Mock
As we have already created the Microservice with a target Url and Proxy mode enabled this will be view quick. First from the service group Overview where we left off you can quickly check the current mocks by clicking "Manage Results" on the Microservice(see Figure 8 again if your unsure), this takes us to the "Requests Manager"
You will see there are now mocks yet, lets create some. Mockdoor is already setup to start creating mocks so all you need to do is start calling the mock endpoint against a real API endpoint target. Json placeholder which we used has an endpoint under "/posts". You could call this via any tool (even a browser for basic GET requests) and it would make the response but first we need to know the URL to call.
Manually working out the URL
We will show a easy UI tool to find the URL but the URL format is always as follows and can be constructed yourself
[Mockdoor base url]/api/mock/[parameter order]/[parameter1/[parameter2]/[parameter3]/[target endpoint]Breakdown of the URL
- Mockdoor base URL: This is simply where is Mockdoor running. for example "https://localhost:44304/dev/mockdoor/" or "https://localhost:44304/"
- Parameter order: This is a 3 character string defining what order you intend to pass the following 3 parameter. The parameters are:
- Tenant path: represented by a "t"
- Group path: represented by a "g" and
- Microservice path: represented by an "m"
- for example the order "tgm" would mean the parameter order would be /[tenant path]/[group path]/[microservice path]
- Target Endpoint: is the endpoint url you intend to call, for example "posts" for the json placeholder example
This may seem complex but will become second nature, the hardest part will be remembering the paths you chose for your Tenant, Group and Microservice!
A example would be something like this
https://localhost:44304/dev/mockdoor/api/mock/tgm/demo/store/jsonp/postsGetting the URL the easy way and creating our first mock!
The easiest way to get the URL is to use the integrated mock testing tool! It not only allows running the requests in the UI but has a tool to copy out and play with the URL as desired.
To get started we need to go to the mock testing page, there is a quick shortcut from the Microservice edit page if you believe you know how to get back to that (under the service group overview click the "edit" (pen icon) button).
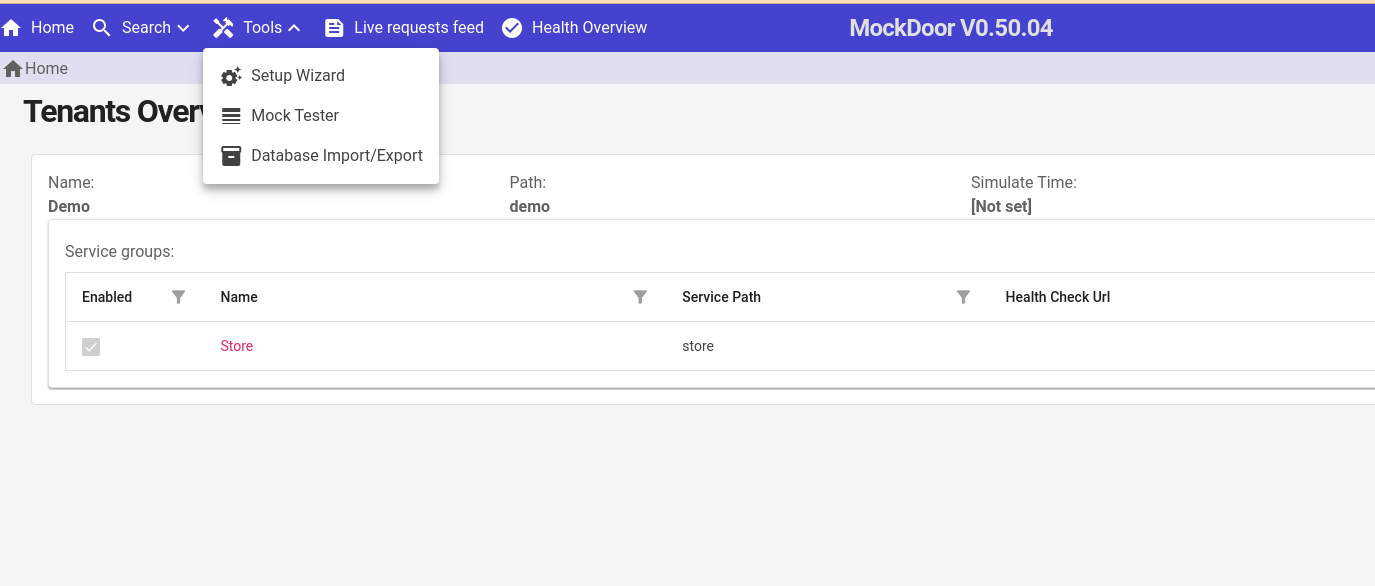
- You can go directly to the test page under the top menu "Tools" and then selecting "mock tester". see Figure 9
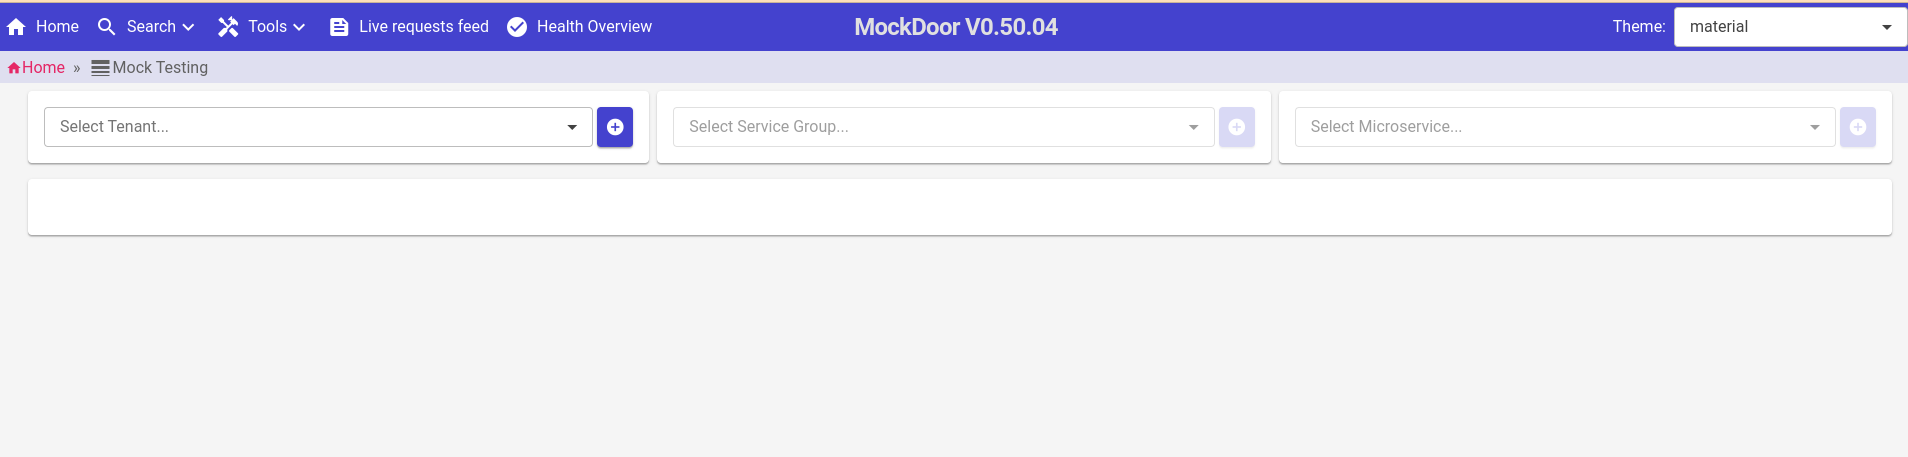
- From there using the top menu to select your tenant, then group and then microservice. see Figure 10
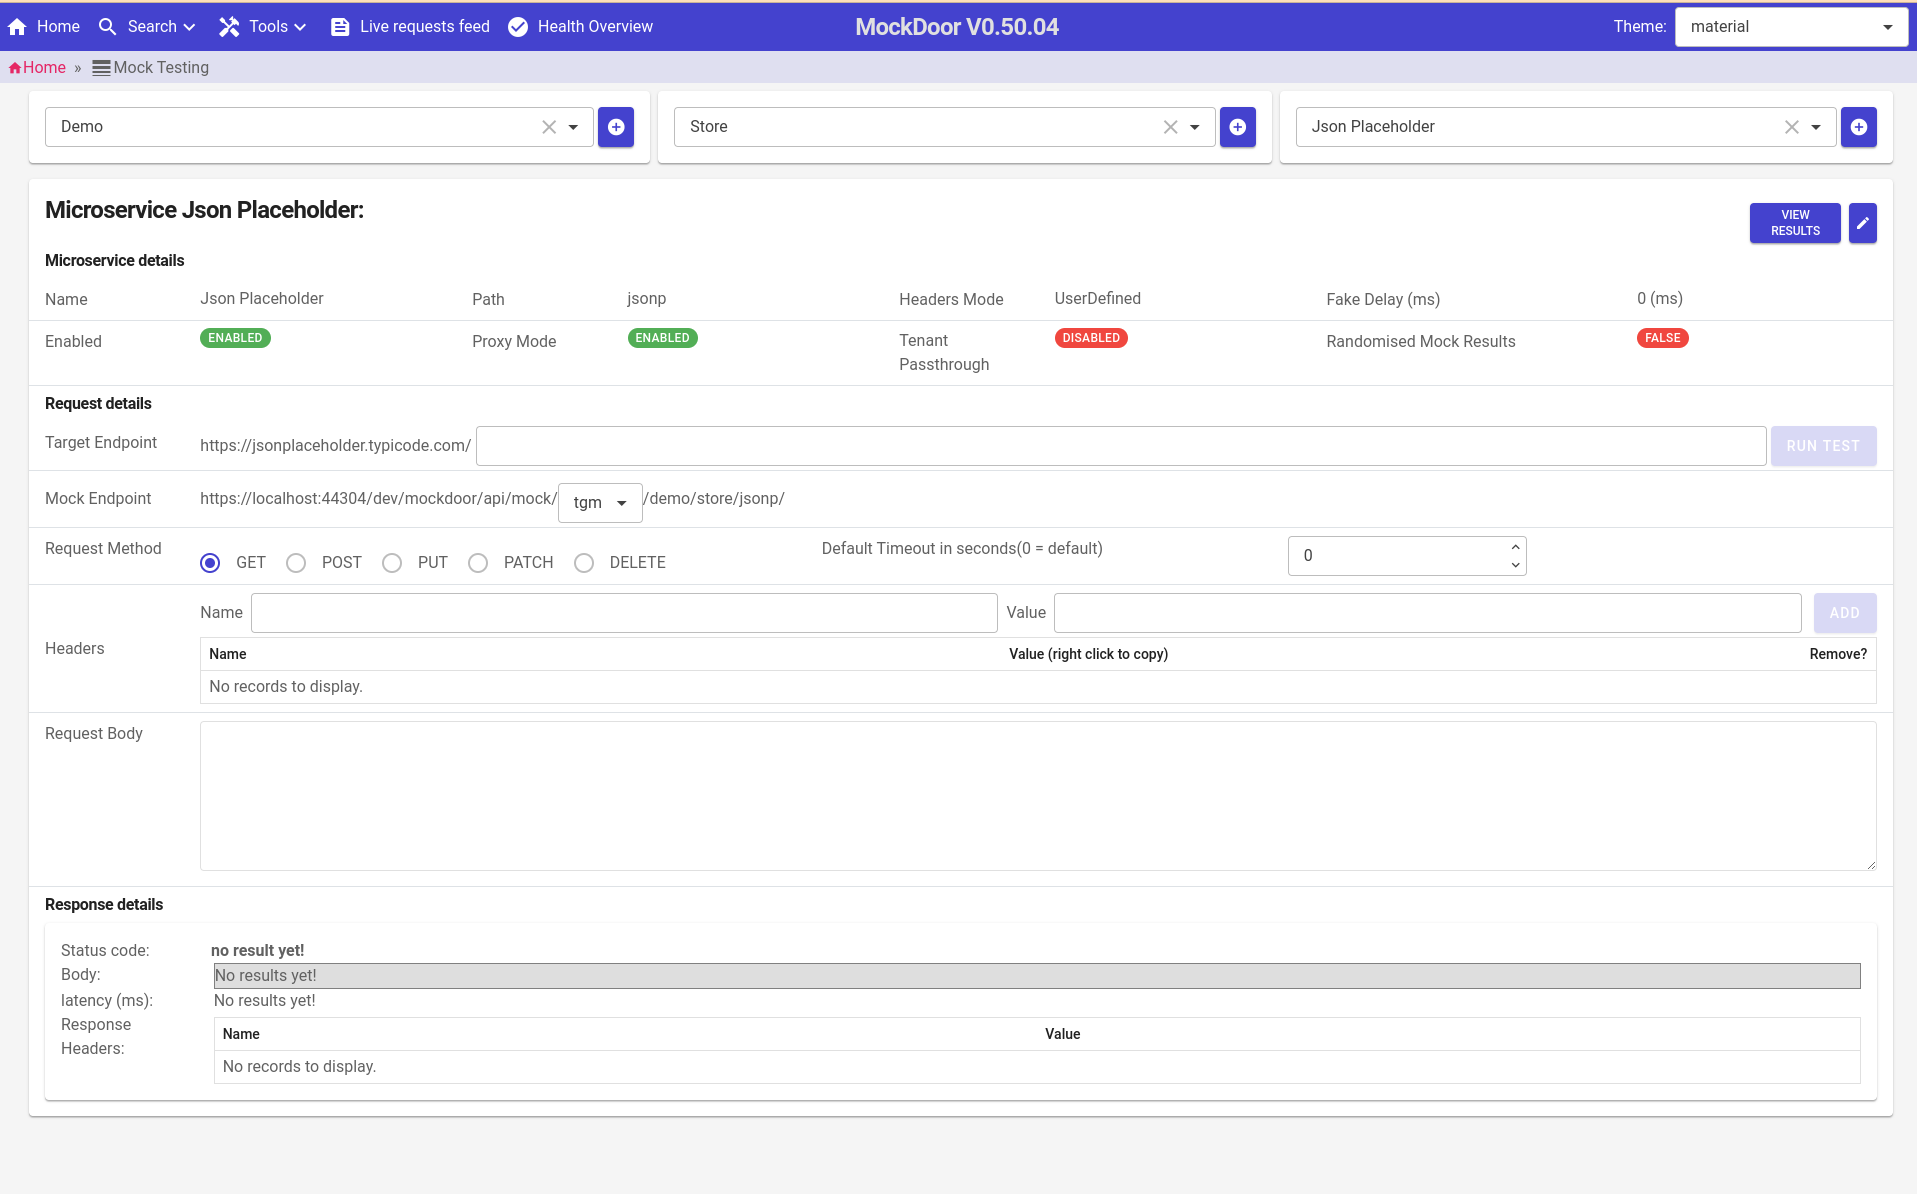
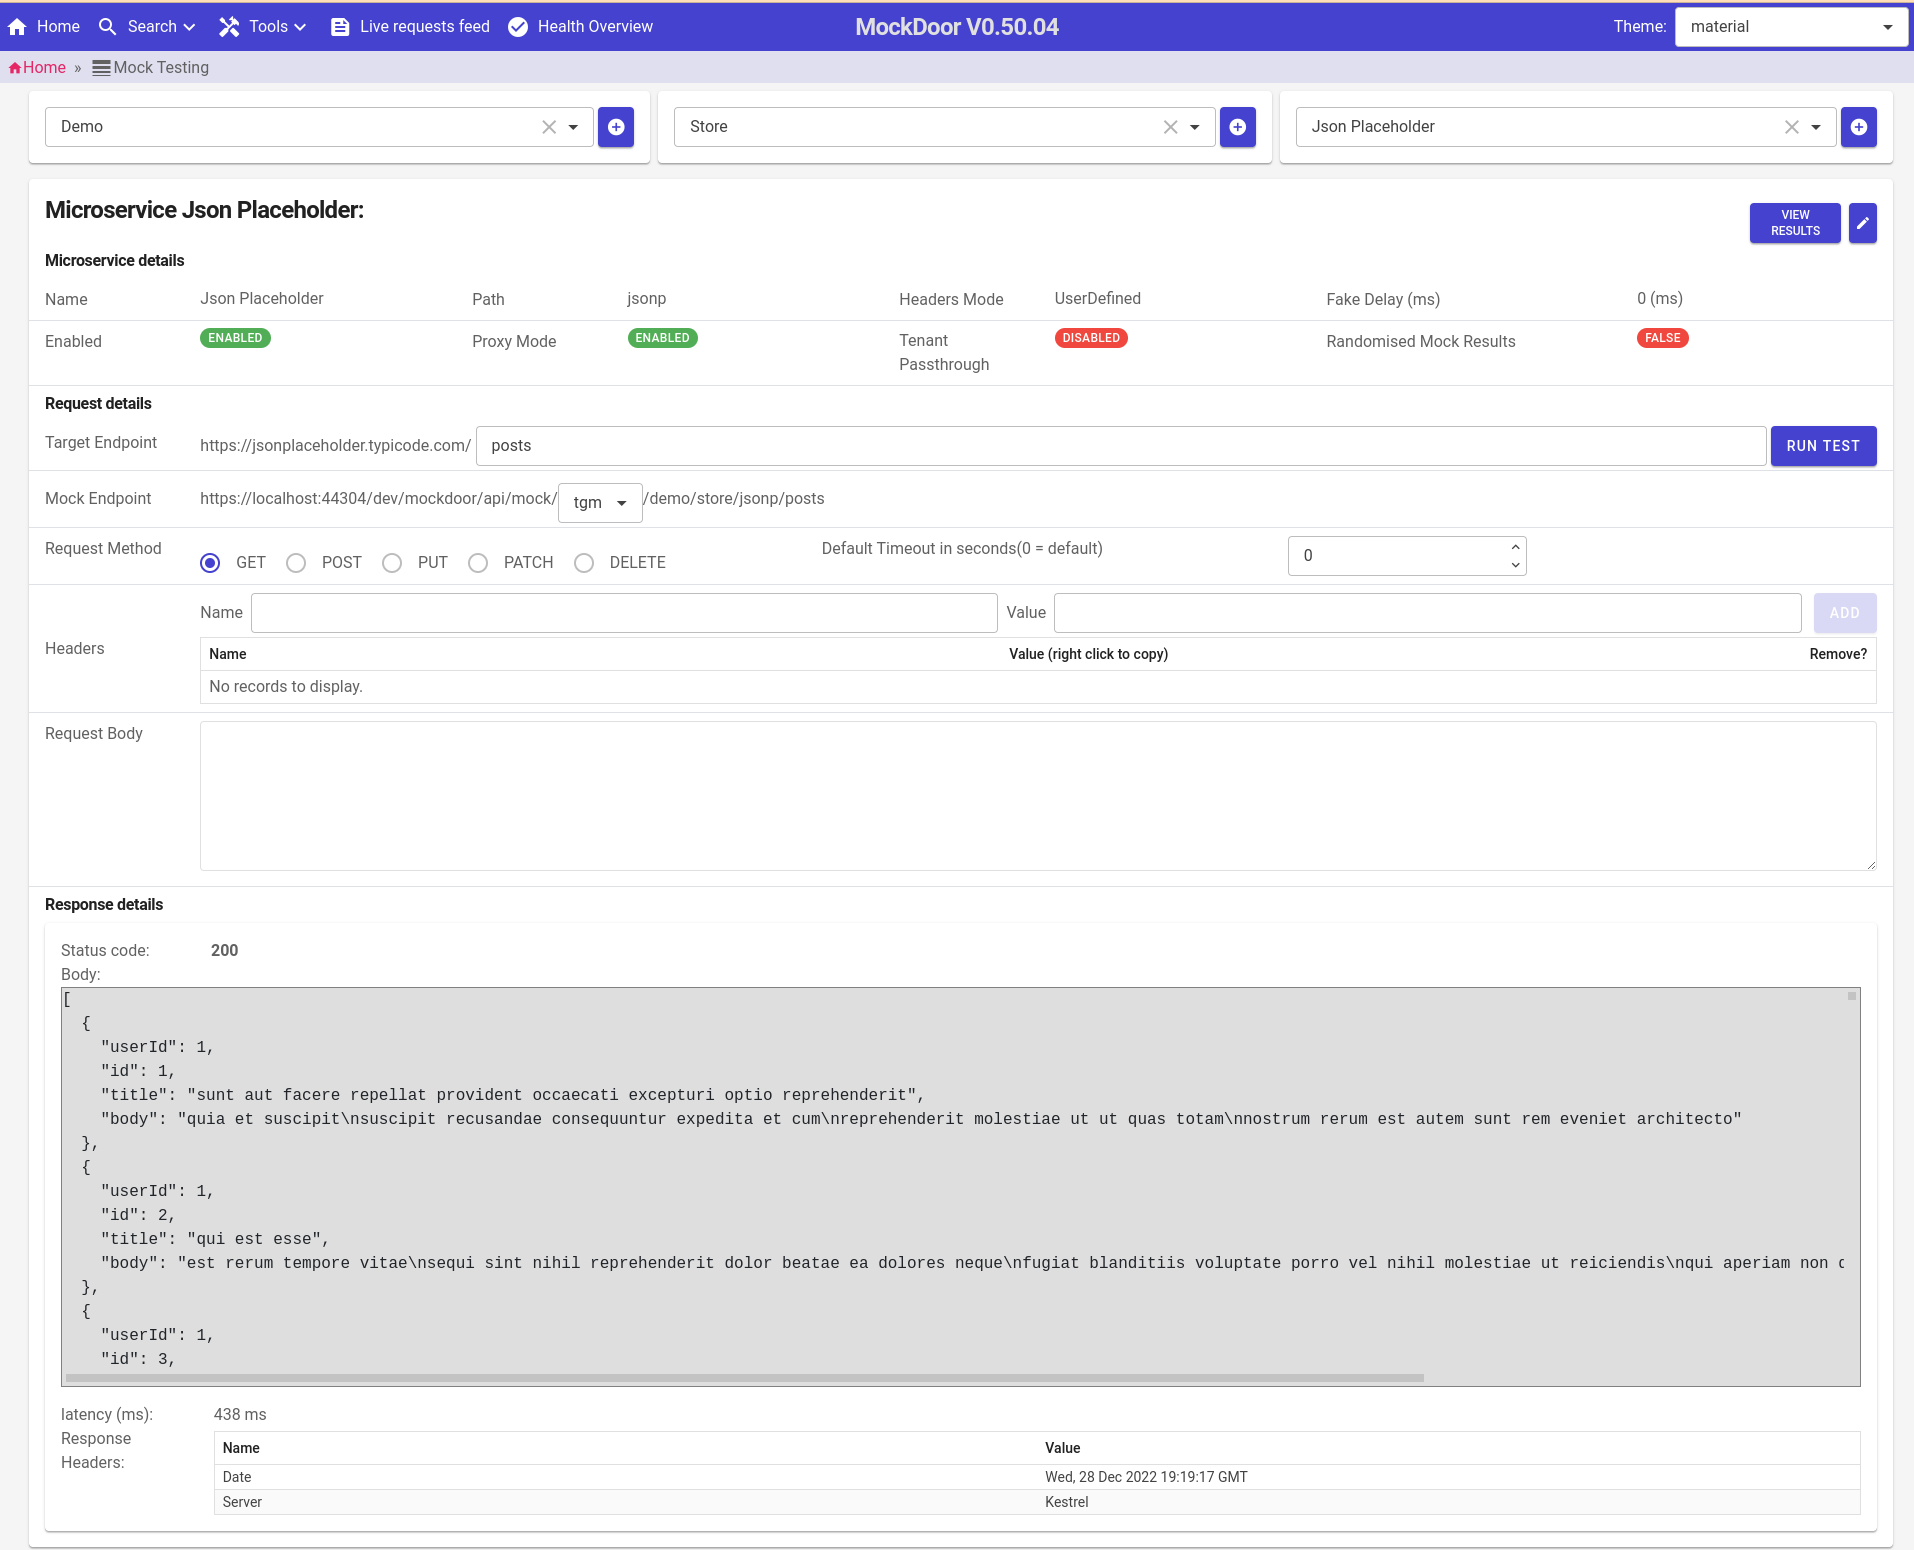
- Once all are selected you will see the mock testing page. see Figure 11
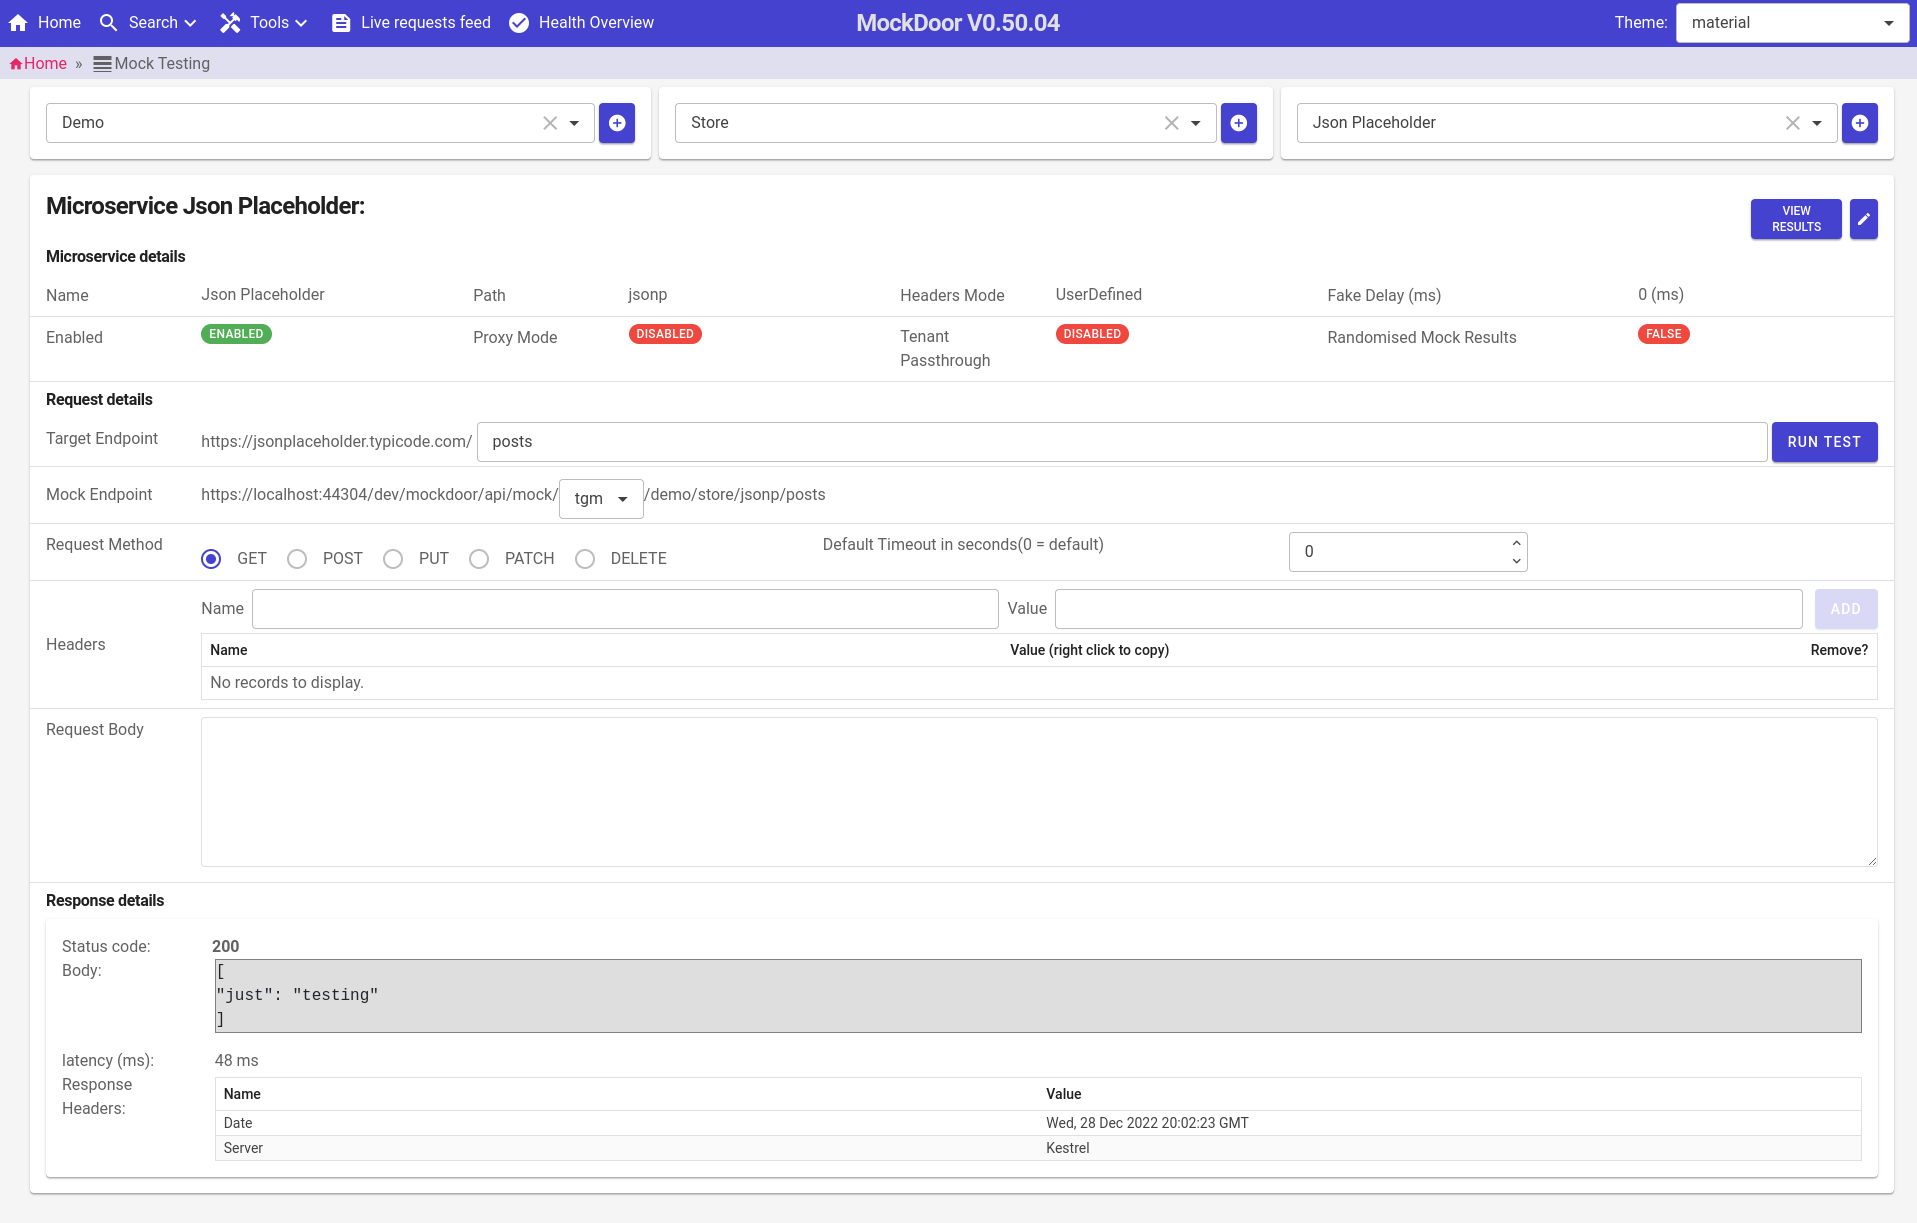
- From here you can enter a "target endpoint" of "posts" and click "RUN TEST"
- You can see your results at the bottom of the page that were returned from the real API. see Figure 12
- Congratulations you have created your first "Automatic Mock". All requests to this Microservice will be proxied and the result stored as a mock!
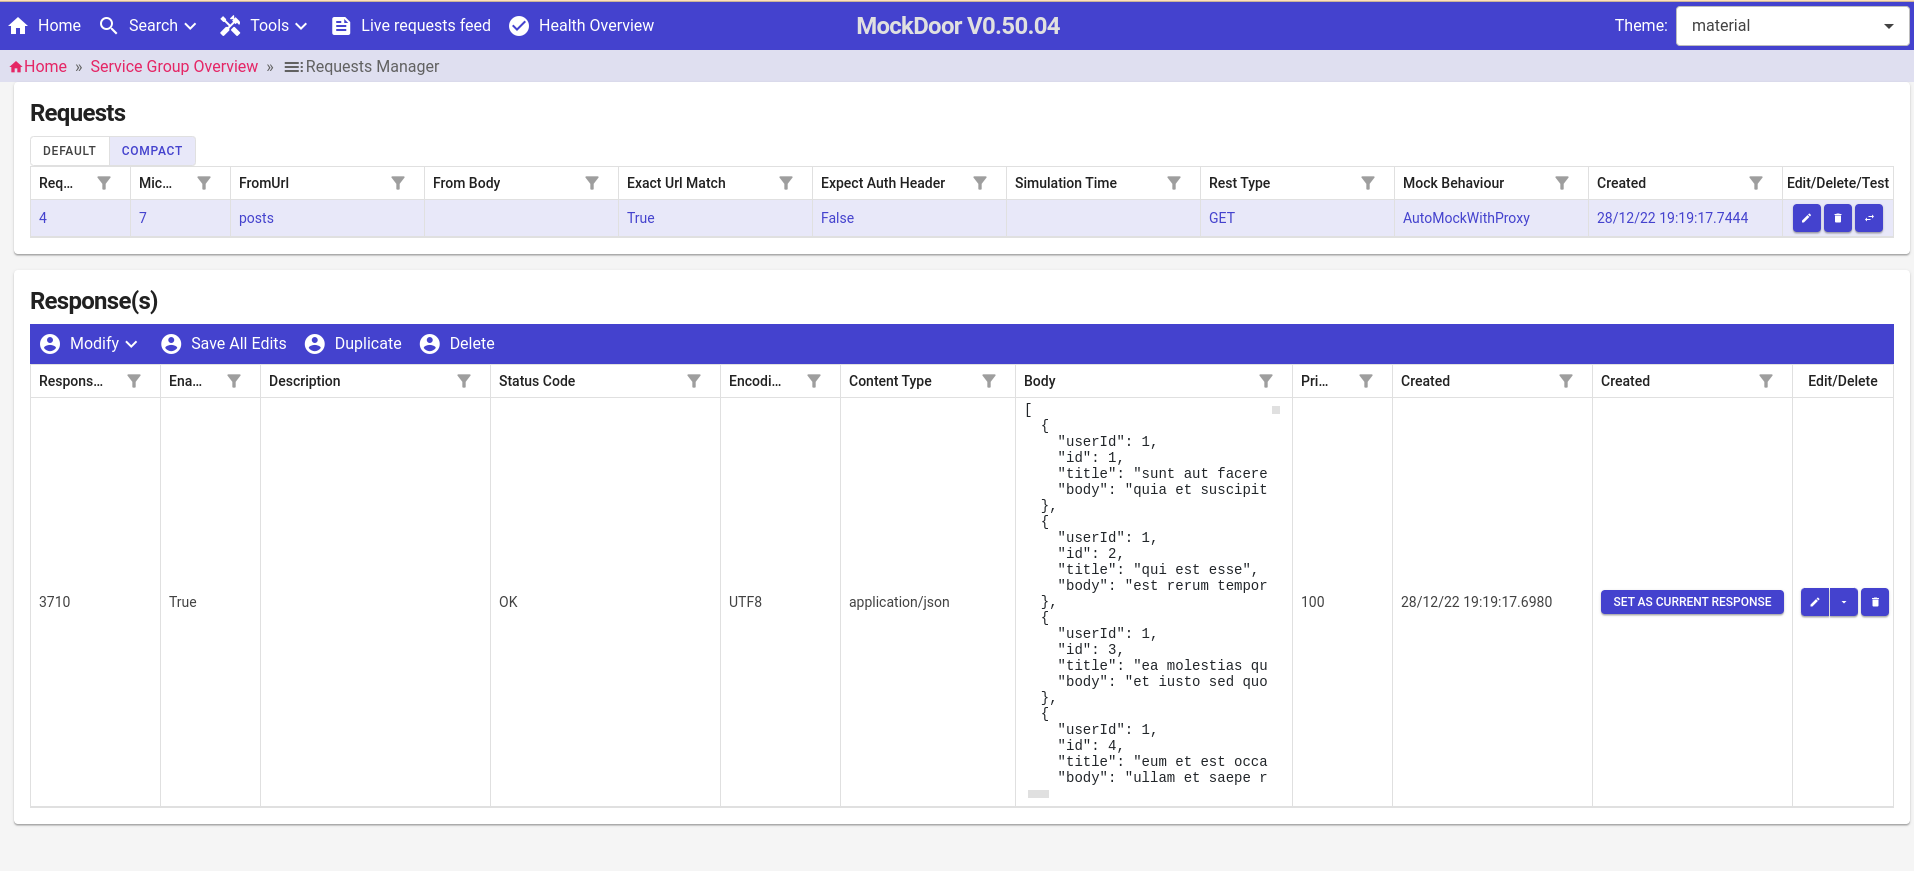
To view your mock you can use the "View Results" button in the top right, this takes you to the "Requests Manager" page we looked at earlier only now we have a result!
The top grid lists the endpoints (Requests) that have been mocked. If you click on the "posts" endpoint (FromUrl column) it will show all the mock responses known for that endpoint and we can see we newly learnt response. See Figure 13
Theres allow we could do from here but for now lets move on to how we might add this mock Manually
Creating a Manual Mock
There are a number of ways we can add new mocks manually. Lets continue in the "Requests Manager" we left off at, from here we can easily add a new mock for the current endpoint (having multiple mocks per endpoint enables features such as "Time travel"!).
For this simple getting started however, to avoid complicating things for now lets create a new mock endpoint, one that doesnt even exist on Json placeholder!
To do this:
- Go back to the Microservice to edit it.
- You can do this by clicking "Service Group Overview" in the breadcrumbs at the top of the page and then clicking "Edit" (pen icon) Microservice
- or from Home=>Manage (group)=>Edit (pen icon) on the Microservice.
- From here at the bottom click "Add Request"
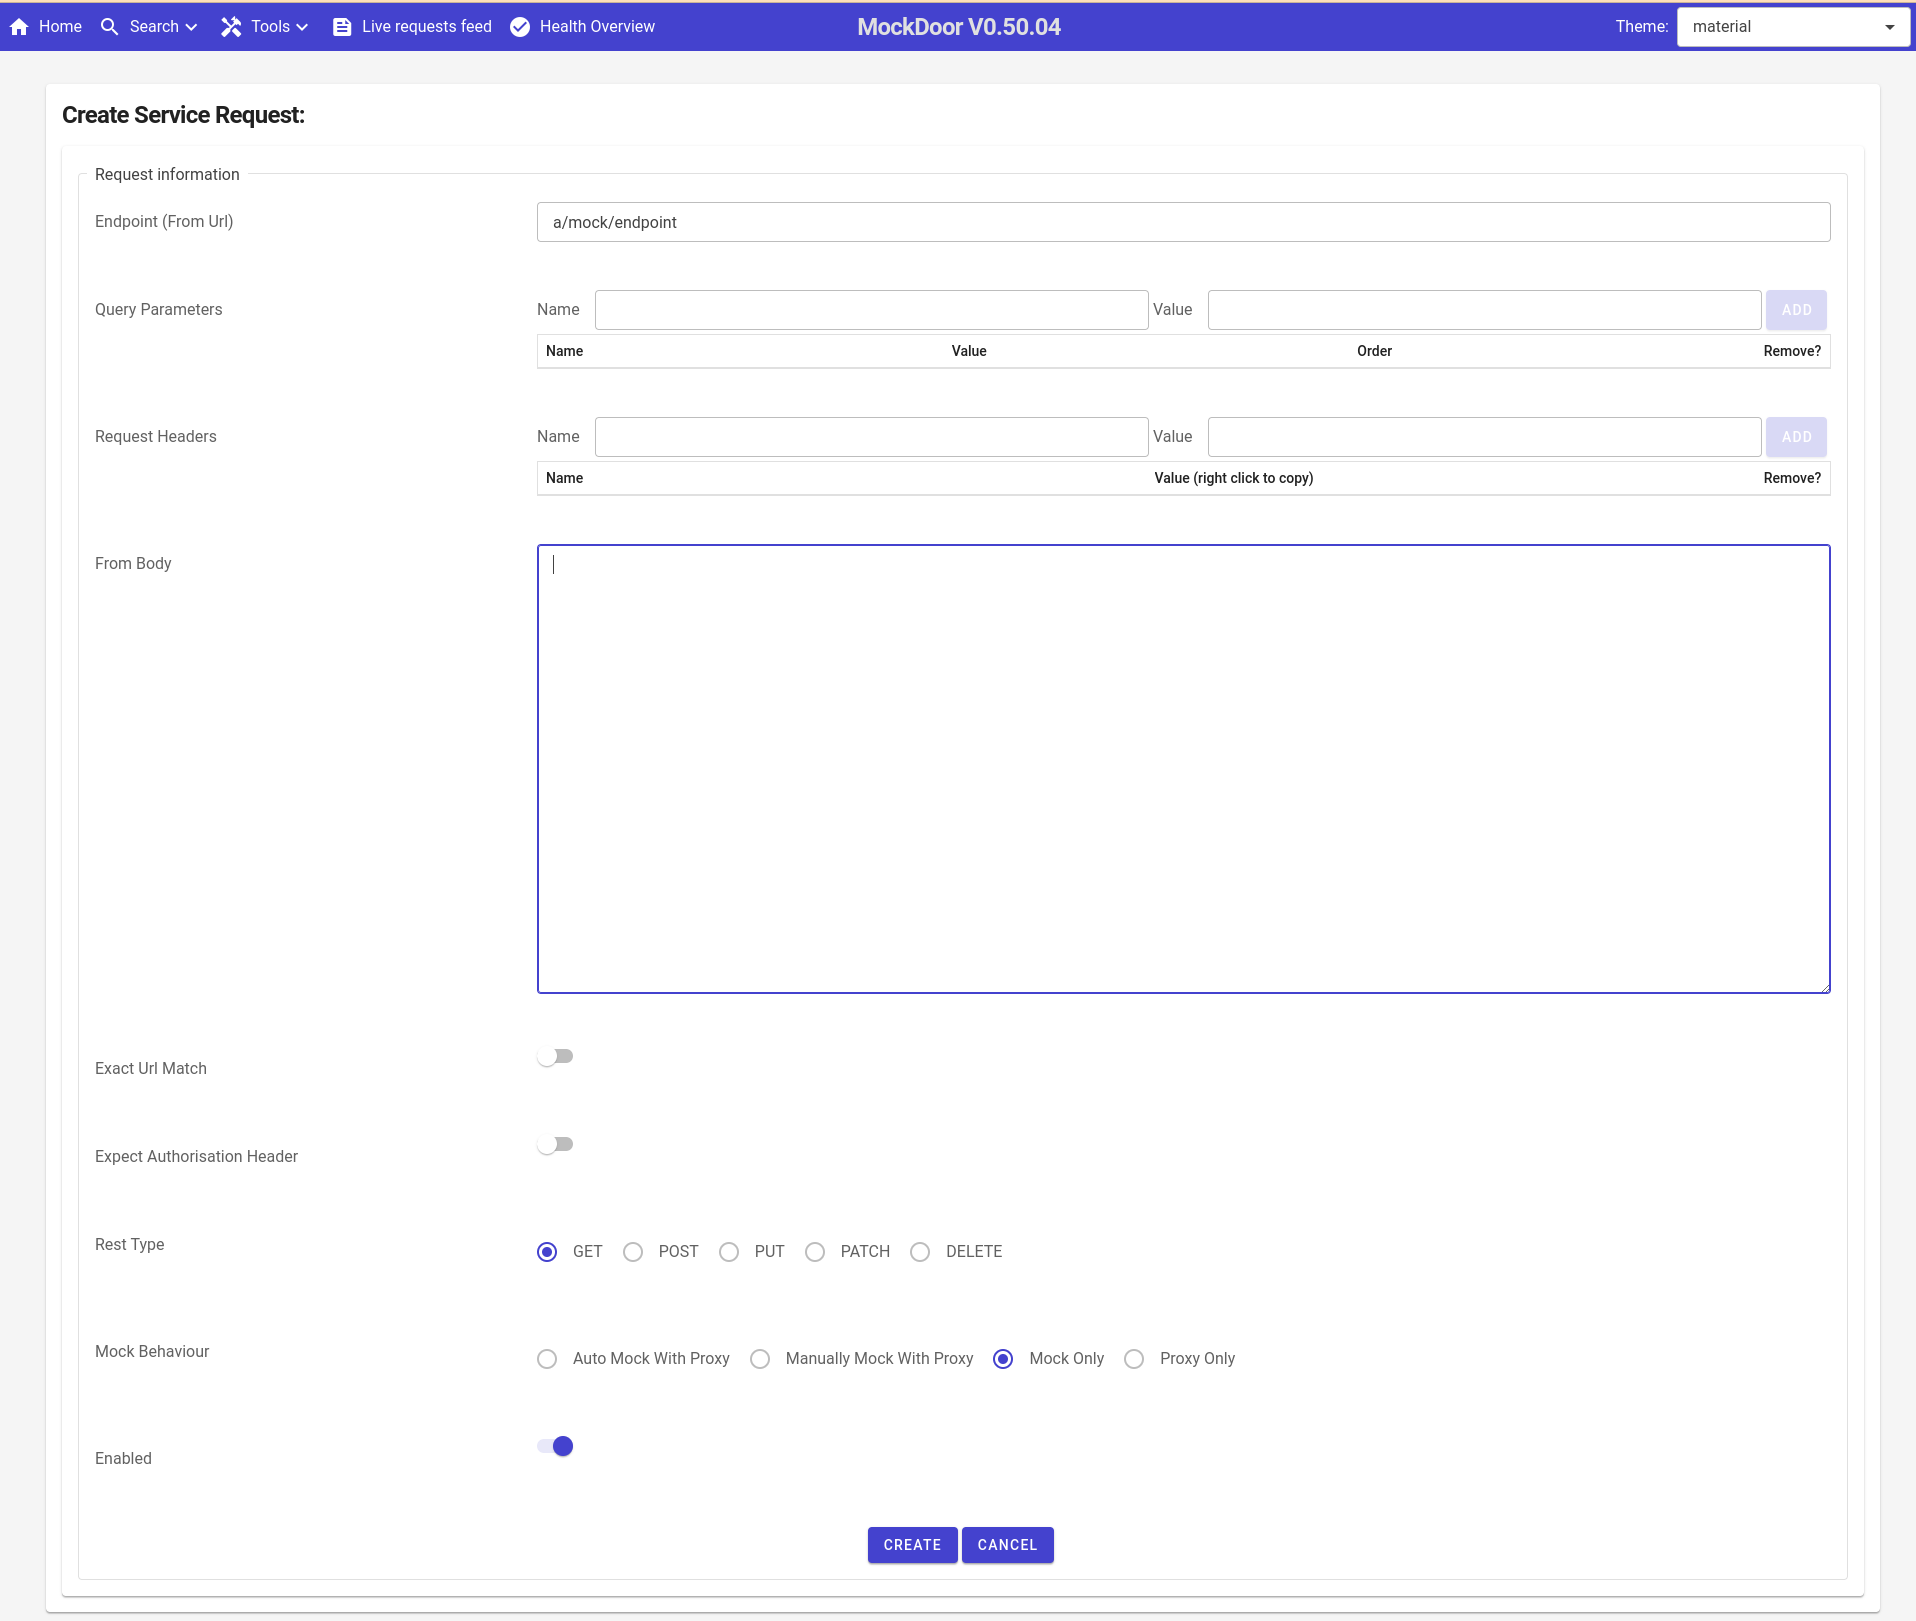
- You will see the Request (endpoint) creation page. Lets create a new endpoint with the following details
- Endpoint (FromUrl): a/mock/endpoint
- Rest type: GET (default)
- Mock behaviour: "Mock only"
- see Figure 14
- Click "Create"
We will now have created a Endpoint for get requests, at a/mock/endpoint. The "Mock Only" option tells Mockdoor we are only mocking this (a real API doesn't exist for this) so it will not try to create mocks for this endpoint when in proxy mode.
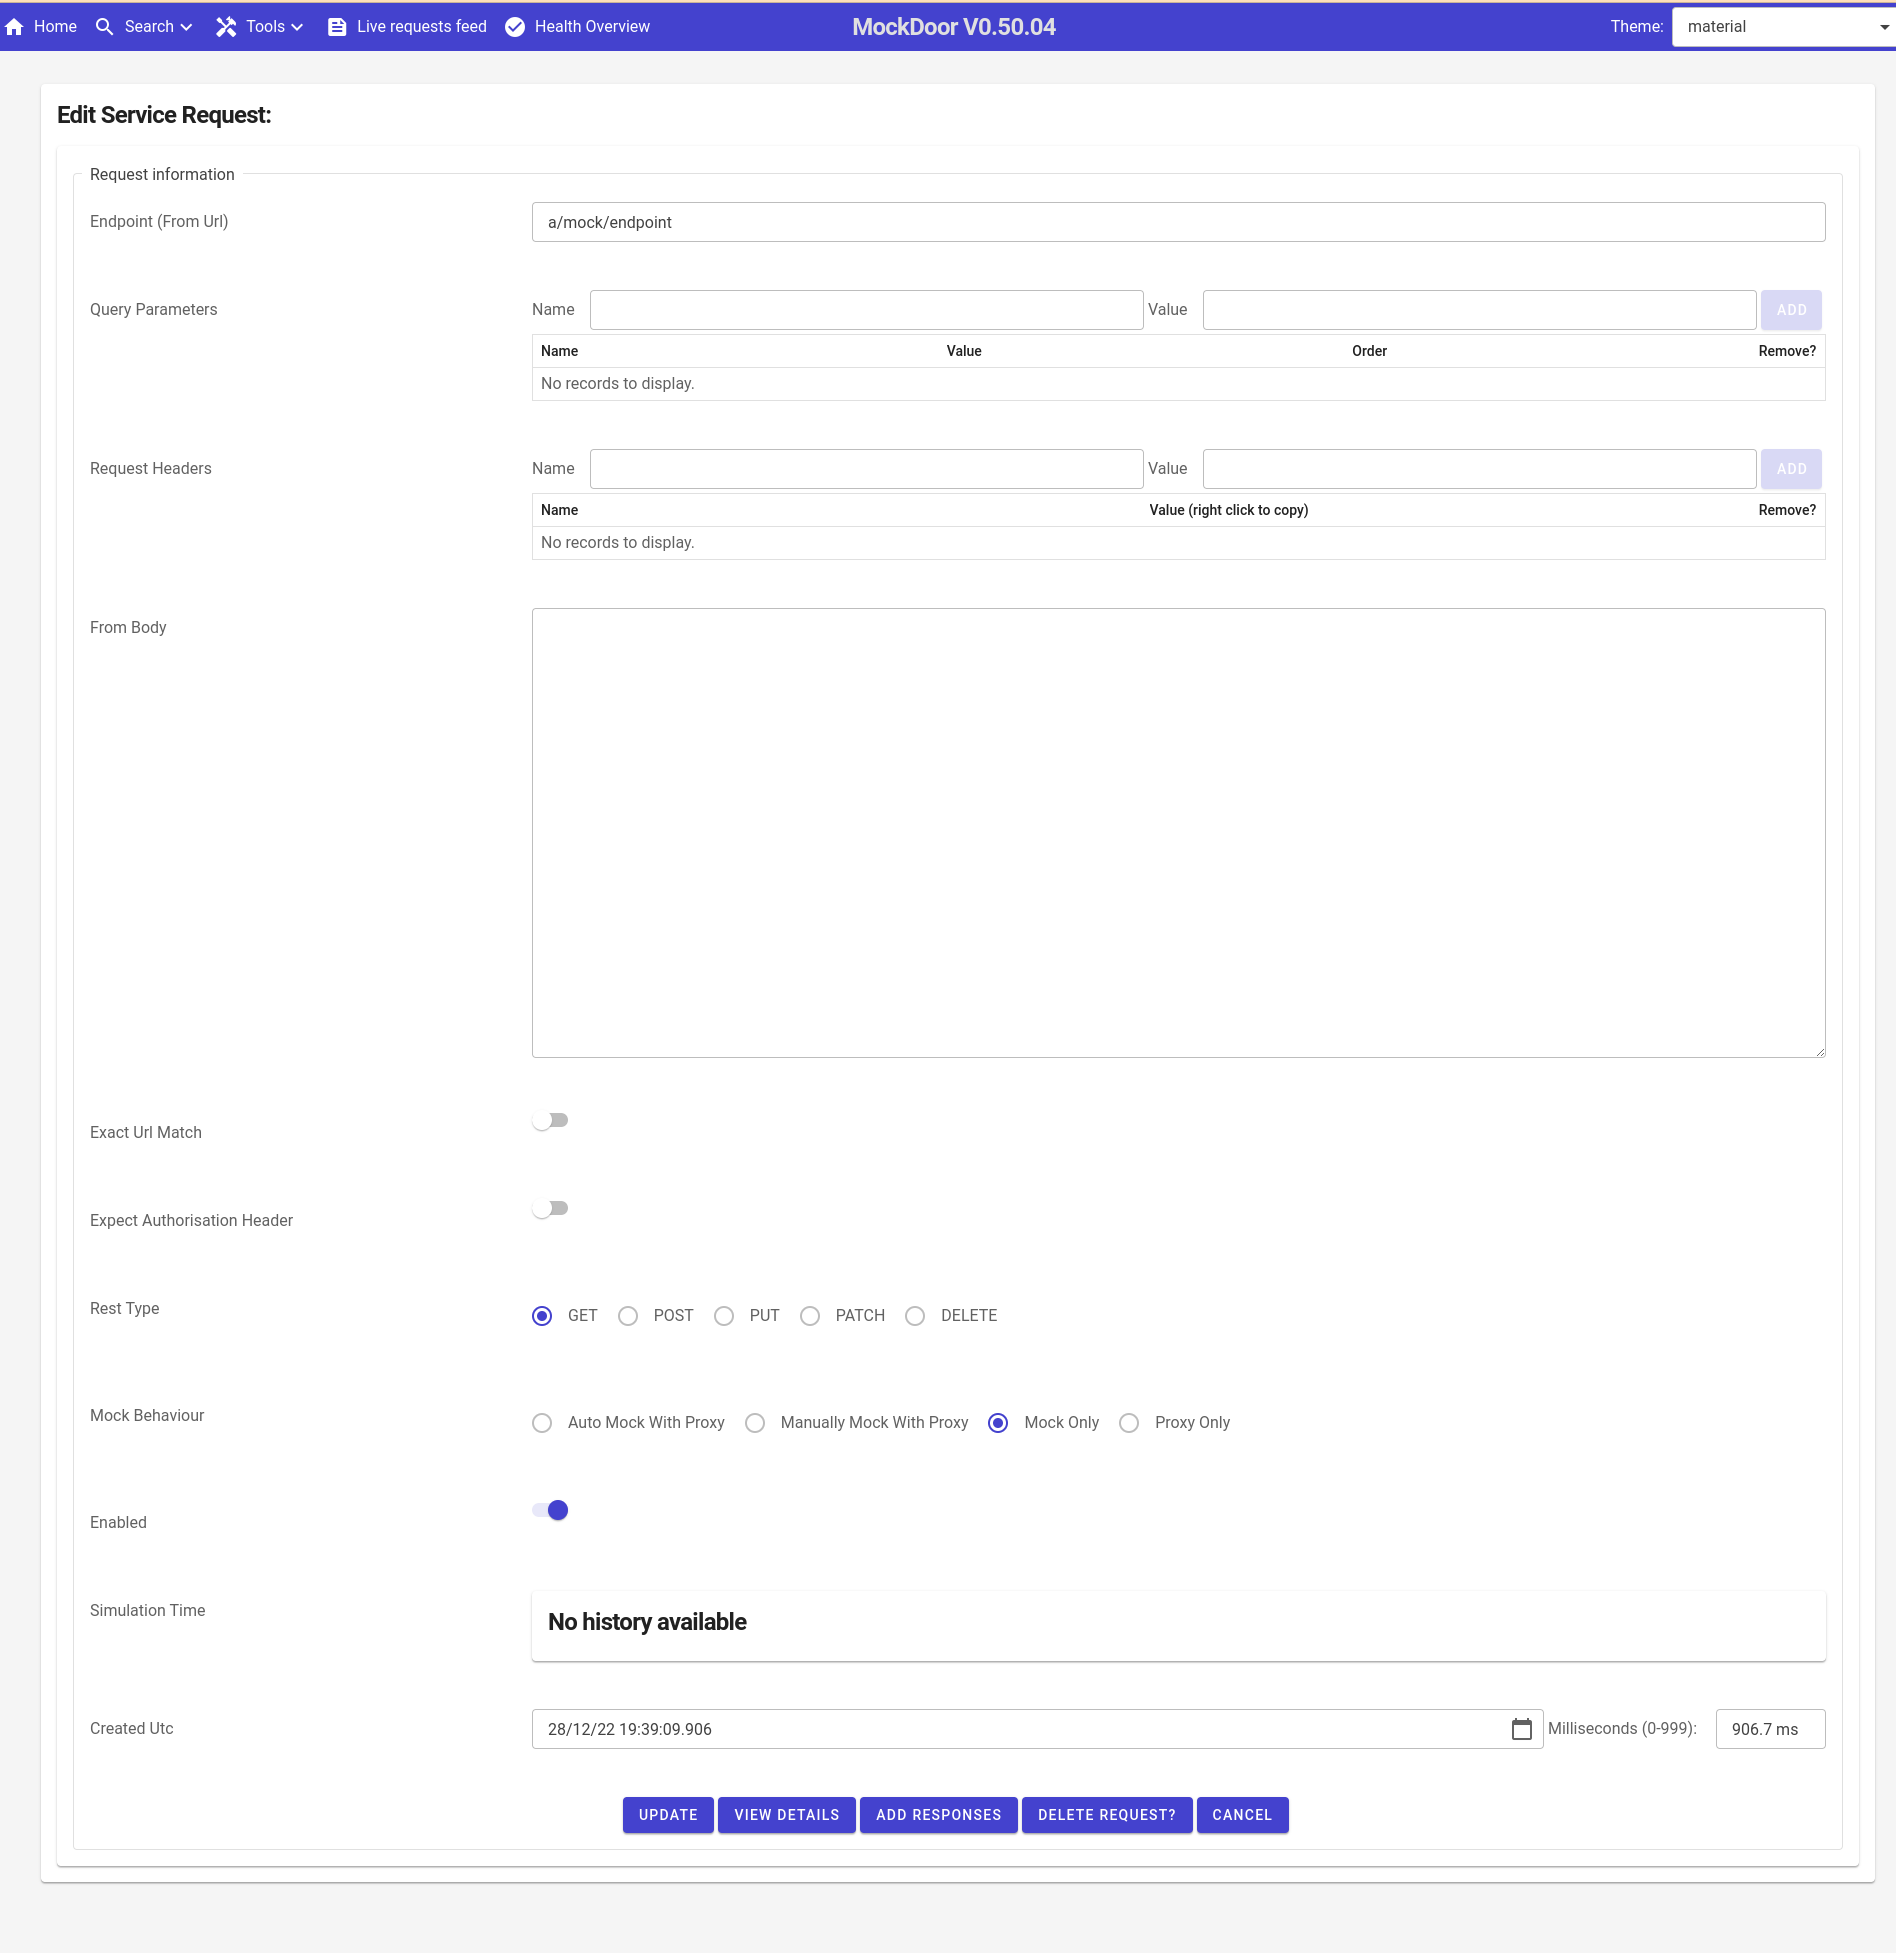
You should now see the page has updated into "Edit mode" and at the bottom is the option to "Add Responses", click this button now. see Figure 15
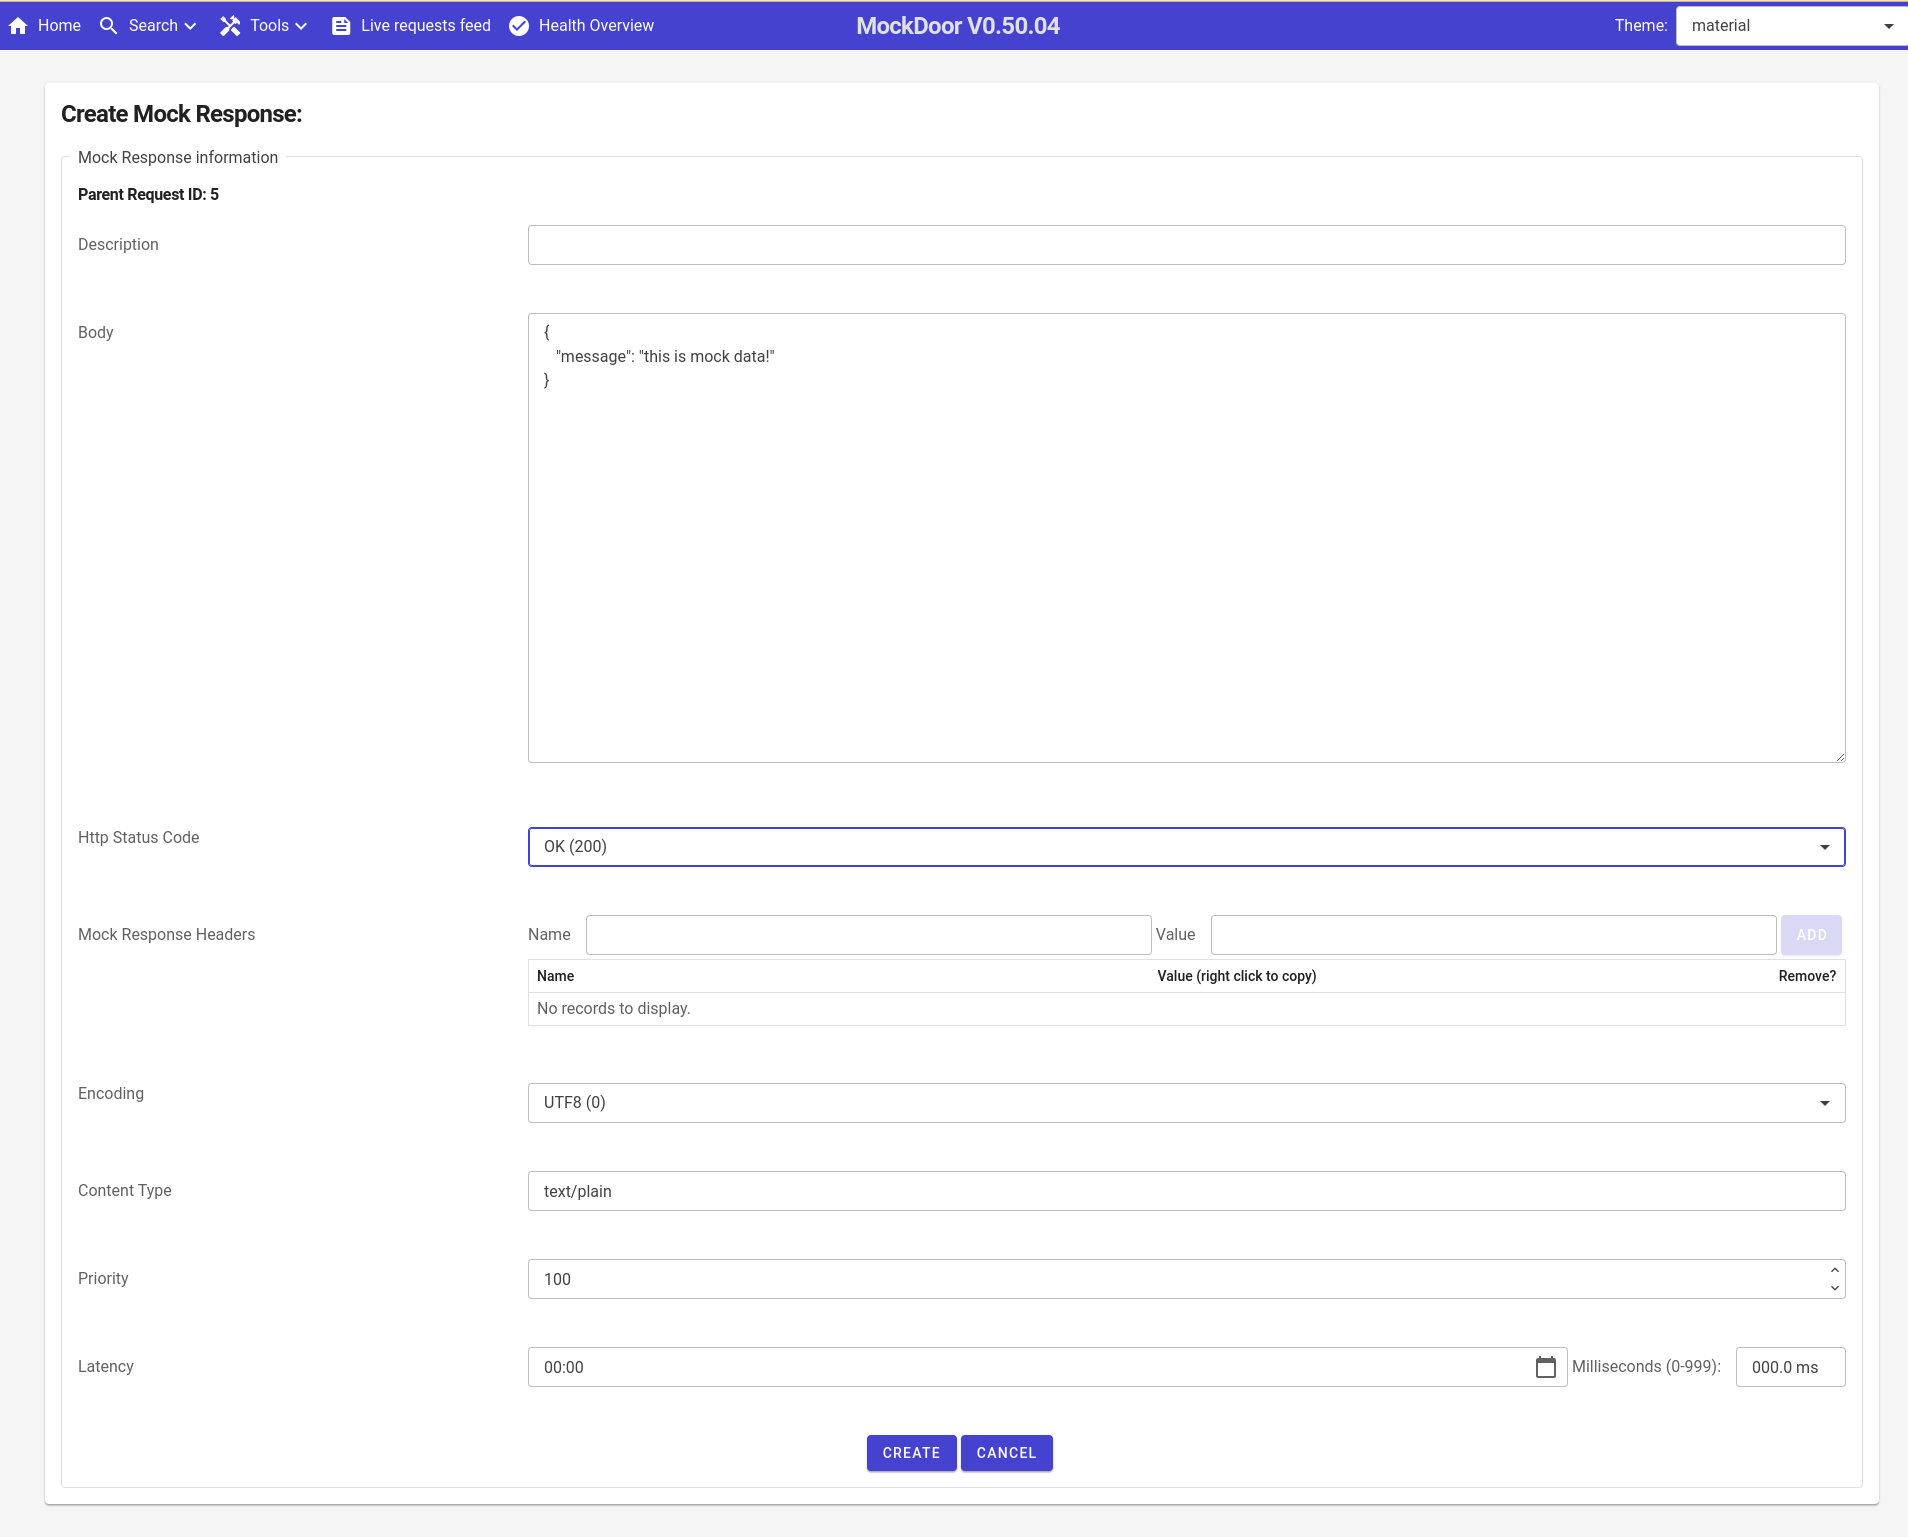
This is the mock creation page, this is the mock that will be returned from the endpoint you just created. Lets fill out some mock details
- Body: set the body so some json or other text you want to return
- Http Status Code: choose a desired status code
- You can specific the content type such as "application/json" to be returned in the "Content-Type" header
- see Figure 16 for an example
- Click "Create"
Congratulations you have now created a Manual Mock, you can see this in the "Request Manager" if you wish.
Beware of non sense responses such as a "204 - no content" status that has a "body". While some handling has been added to handle this kind of badly configured mock, you likely get unexpected or desired behaviour if you do not put sensible data in your mock!
Testing your Mocks
You can now test your mocks using the built in tool or another tool and calling the Mockdoor url. For this we will use the build in tool again.
Testing our Automatic Mock
Currently we are proxying requests so our Automatic mock wont actually be returned. you could test this by editing it and running the test we ran before when creating the mock. If we did this we would see we still get the real API response not our mock, we would also notice the endpoint now has two mocks! This is because Mockdoor recognised the current editted mock wasnt the same so updated the list with the latest API response.
So to actually see use our Mocks we first need to turn off "Proxy (training) mode" but in this case we also want to see for sure we have our mock data so just to make it clear (as we cant exactly turn off Json placeholder).
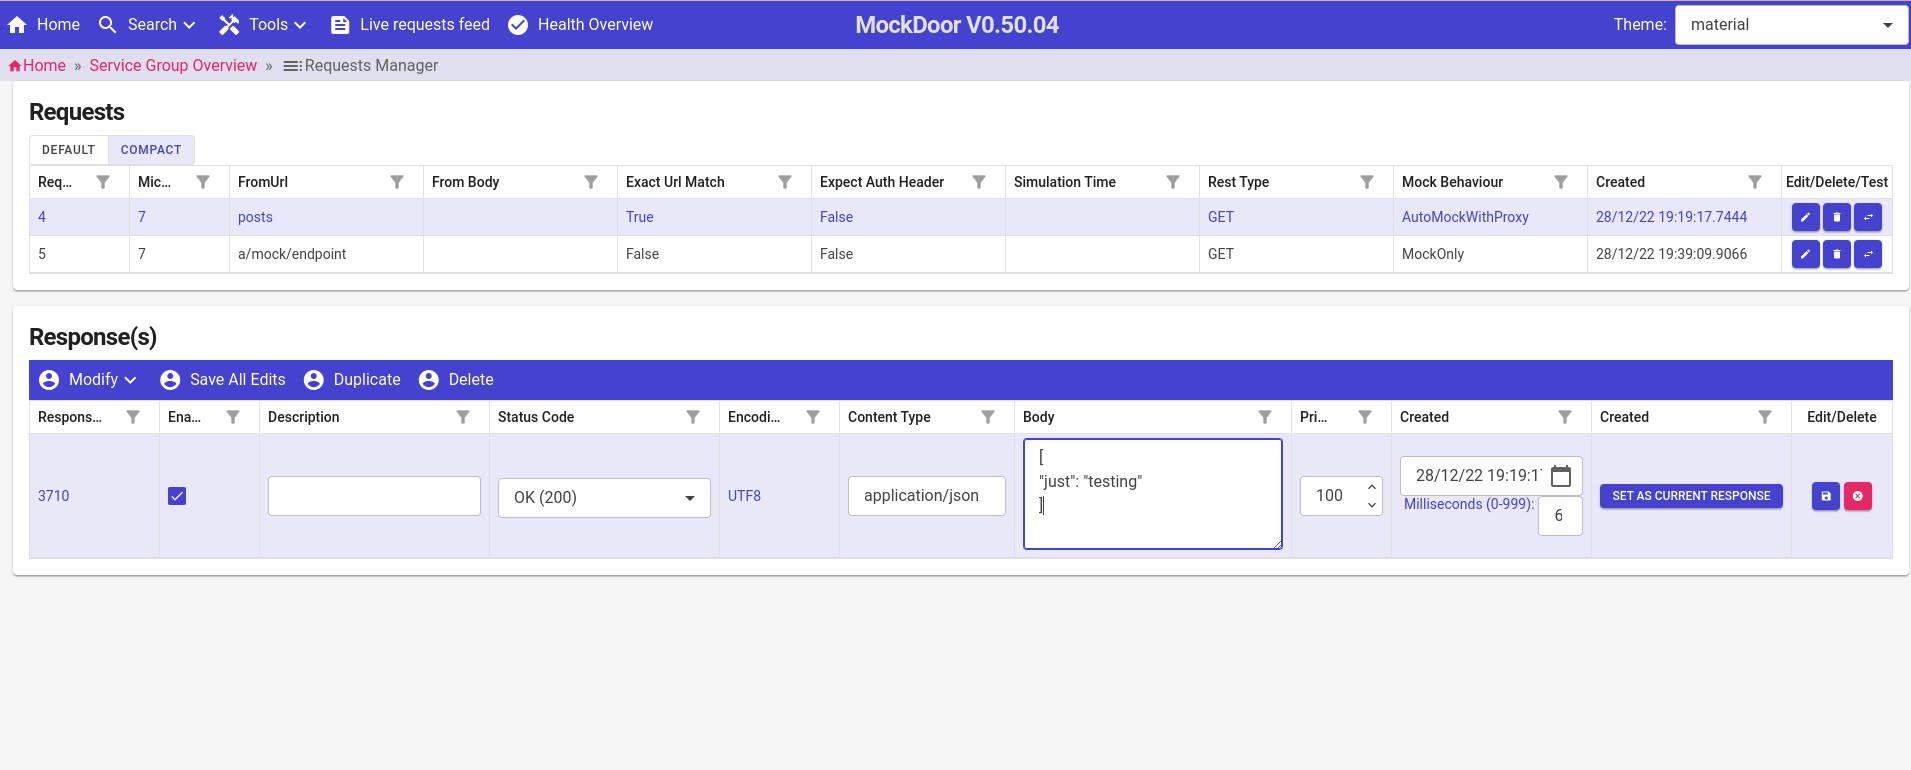
- First go the the "Request Manager" and select the "posts" endpoint.
- in the bottom we can click on the response rows "edit" button (with the pen symbol)
- we can see the row becomes editable see Figure 18
- edit the body to something easy to see is different to the current response
- click the save icon and we have
We now have a easy to see mock response for this endpoint
Next the the easiest way to continue would be to use the "Mock Tester" tool again. lets first go back the the "Mock Tester" tool.
From here we can rerun the test and see we still get the real API response (this is because we havent yet disabled "Proxy Mode")
So follow these steps:
- type "posts" in the endpoint field and click "RUN TEST"
- confirm we get the real API response
- now lets turn off "Proxy mode" to get our mock result
- Click the edit (pen) icon in the top right, this will take you to the Microservice edit page
- Toggle "Proxy mode" to off
- Click update
- you should be returned to the testing page
- now enter "posts" again and click "RUN TEST" again
- we should see our mock response not the real one! See Figure 19
If you want you can easily go back and re-enable "proxy mode" to see the real API responses again
Testing our manual response
Testing the manual mock should be quite easy now as we have disabled "Proxy Mode" already and we know any response is from our mock.
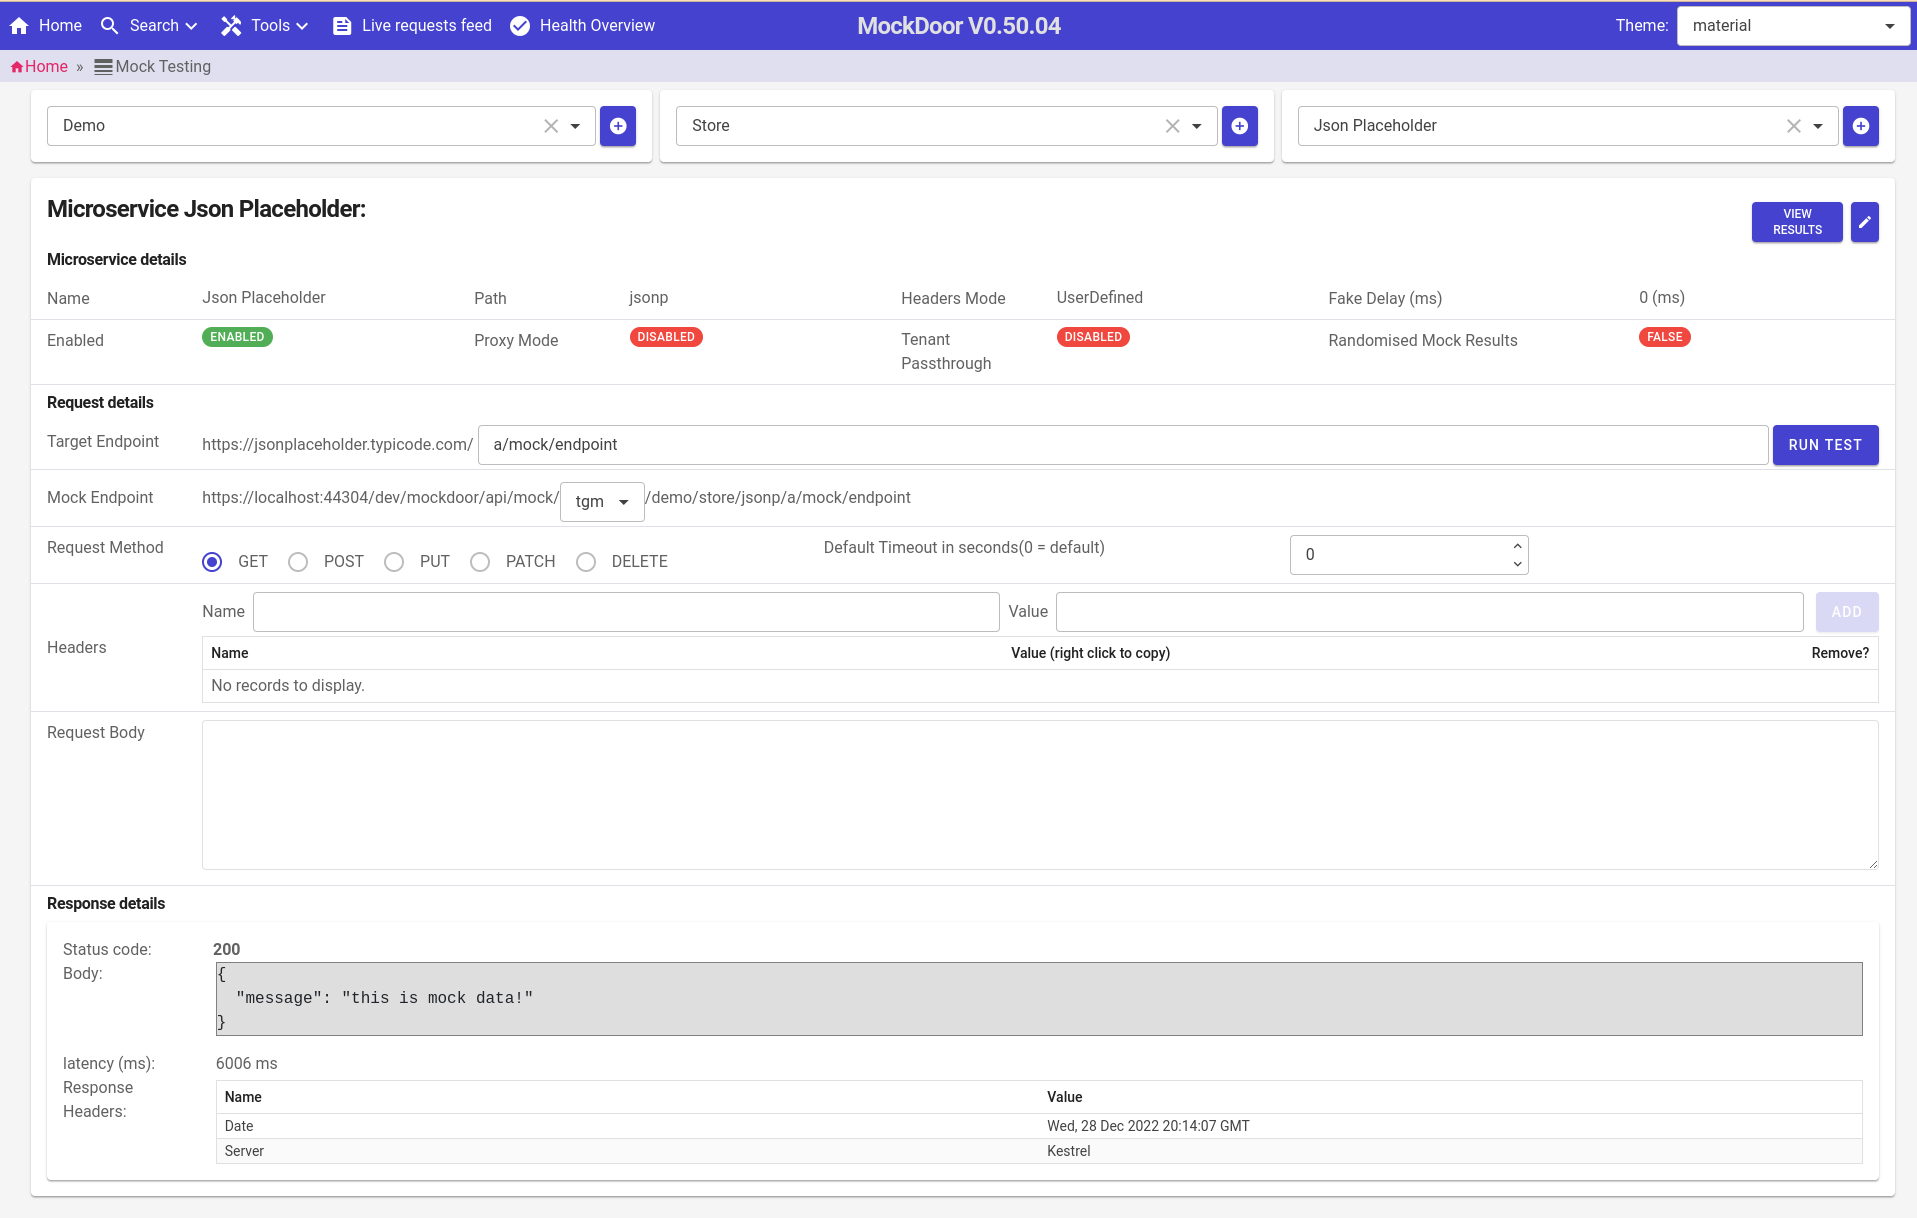
To test the Mock lets do the following:
- Go back to our "Mock Tester" tool
- Select the Microservice using the top dropdowns
- enter our mock endpoint in the endpoint field "a/mock/endpoint" and click "RUN TEST"
- you should see your mock response! See Figure 20
Troubleshooting
As common troubles are reported or discovered this section will be populated with known workarounds or solutions.
Figures